4. Tropical Paradise Deck-Patio Combo
Living through three brutal winters in a row made me desperate for something that screamed permanent vacation. I wanted to step out my back door and feel like I’d been transported to some exotic resort.
The tropical paradise deck-patio combo became my escape plan. And honestly? It was the most complex project I’d ever attempted.
But walking out there now with my morning coffee, surrounded by lush greenery and the sound of trickling water, I can tell you it was worth every frustrating moment.
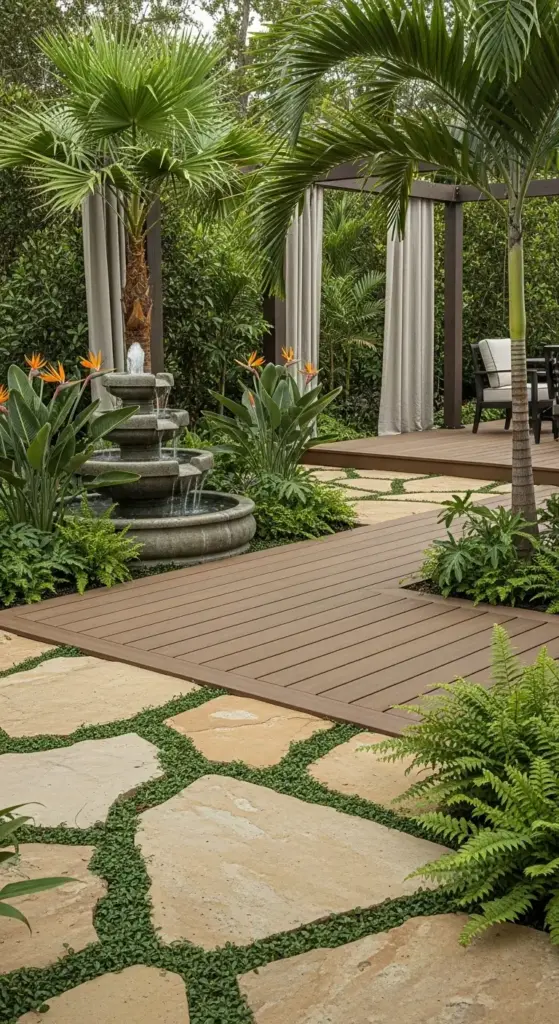
Combining Composite Decking with Stone Sections
My original plan was to do the entire space in composite decking. Simple, right? Wrong.
I quickly realized that all decking would look like a giant boardwalk, not the varied tropical landscape I was envisioning.
Composite decking works beautifully for the main entertaining areas, but you need stone patio sections to break it up and create visual interest.
I went with Trex composite in a warm teak color for the deck portions. It’s pricier than wood – about $8 per square foot installed – but it never needs staining and won’t warp in humidity.
For the stone sections, I chose natural flagstone in warm earth tones. The key was creating flowing transitions between the deck and stone areas, not harsh straight lines.
My biggest mistake? Not planning the height differences properly. I ended up with a 3-inch step between my deck and stone that looked awkward and was a tripping hazard.
The contractor had to come back and install transition strips, which added another $800 to the project. Learn from my mistake and plan those elevations carefully.
The final layout has the main deck area for dining and lounging, with stone pathways winding through the planted areas. It feels organic and tropical, not geometric.
Creating Lush Tropical Foliage
Here’s where I went completely overboard initially. I bought every tropical plant I could find and crammed them everywhere like some kind of jungle explosion.
Half of them died within the first month.
Tropical plants need specific conditions, and I learned this the expensive way. You can’t just stick a bird of paradise in full sun and expect it to thrive.
Palms became my backbone plants. I have three large Majesty palms in huge planters that create instant tropical vibes. They’re surprisingly cold-hardy and forgiving for beginners.
Bird of paradise plants are stunning but picky about placement. Mine are in spots that get morning sun but afternoon shade, and they’ve rewarded me with those incredible orange and blue flowers.
Ferns fill in the understory beautifully. I use Boston ferns in hanging baskets and large staghorn ferns mounted on the fence. The texture contrast is amazing.
The secret is layering – tall palms for structure, medium-height flowering plants like bird of paradise, and low ferns and tropical groundcovers to fill in.
I also learned that container gardening is essential in most climates. When winter comes, I can move the most tender plants into my garage.
Adding the Perfect Water Feature
This is where I made my most expensive mistake. I installed a beautiful stone waterfall feature without properly considering drainage and pump placement.
Three weeks later, my neighbor’s basement was flooded.
Water features need serious planning, especially regarding runoff and electrical requirements. I ended up hiring a landscape contractor to completely redo the installation.
The new setup includes a recirculating fountain with a hidden reservoir system. The water flows over natural stone into a gravel bed, then gets pumped back up through underground lines.
The soothing sounds completely transform the space. It masks traffic noise and creates this incredible zen atmosphere that makes you forget you’re in suburbia.
I went with a three-tier stone fountain that looks like a natural rock formation. The water sound is gentle, not overwhelming – perfect for conversation areas.


Pro tip: Install a timer system so the fountain runs during peak usage hours but shuts off at night. Your electric bill and your neighbors will thank you.
The total cost for professional water feature installation was $3,200, but it’s honestly the element that gets the most compliments from guests.
Outdoor Curtains for Privacy and Style
I initially tried to create privacy with more plants, but it would’ve taken years to grow enough coverage. Outdoor curtains were the perfect instant solution.
My first attempt was a disaster – I hung regular indoor curtains thinking they’d be fine. One rainstorm later, I had moldy, shrunken fabric hanging everywhere.
Weather-resistant outdoor curtains are essential. I went with Sunbrella fabric in a natural linen color that complements the tropical theme perfectly.
The key is proper hardware. I used stainless steel curtain rods and marine-grade grommets that won’t rust or corrode in humidity.
I have curtains on three sides of the main deck area, creating this incredible outdoor room feeling. They provide privacy from neighbors while still allowing airflow.
The curtains also add movement and softness to balance all the hard surfaces. When they flutter in the breeze, it adds to that tropical resort atmosphere.
During parties, I can tie them back completely for an open feel, or close them partially for more intimate gatherings.
Designing an Outdoor Kitchen and Bar Area
The outdoor kitchen was something I added in year two, and I wish I’d planned for it from the beginning. Retrofitting utilities was way more expensive than doing it during initial construction.
I kept it simple – a built-in grill, mini fridge, and prep counter with storage underneath. The counter is made from the same stone as my patio sections for continuity.
The bar area is my favorite feature. It’s a curved stone counter with three bar stools, positioned to overlook the water feature and tropical plantings.
I installed a small sink in the bar area, which required running both water and electrical lines. This was definitely a job for professionals – cost about $1,800 for the utility work alone.
The bar top is sealed concrete with embedded shells and sea glass for that tropical feel. It looks expensive but was actually pretty budget-friendly to create.
Storage was crucial – I have weatherproof cabinets for dishes, a wine fridge, and even a small ice maker. Nothing kills the tropical vibe like running inside every five minutes.
Maintenance Tips for Lush Tropical Plants
Here’s the reality nobody talks about – tropical plants require way more maintenance than I expected, especially in non-tropical climates.
Watering is critical but tricky. Most tropical plants hate being too wet or too dry. I installed a drip irrigation system with timers, which was a game-changer.
Fertilizing needs to happen regularly during growing season. I use a slow-release tropical plant fertilizer every six weeks from spring through early fall.
The biggest challenge is winter protection. I have to move about half my plants into the garage or wrap them in frost cloth. It’s a pain, but necessary for survival.
Pest control is ongoing. Spider mites love tropical plants, especially indoors during winter. I inspect everything weekly and treat problems immediately.
Pruning keeps everything looking lush but not overgrown. I learned to prune palms carefully – cut the wrong frond and you can damage the whole plant.
My weekly routine includes checking soil moisture, deadheading flowers, and cleaning leaves. It sounds like a lot, but it’s actually pretty relaxing.
The payoff is incredible though. When everything is thriving, the space truly feels like a tropical paradise. Worth every bit of extra effort.
Ready to find your inner peace with a Zen Garden Patio Retreat that’ll become your daily meditation sanctuary? Click “next” below to discover how bamboo, natural stone, and flowing water can create the ultimate stress-free outdoor space – plus I’ll reveal the gravel mistake that had me re-doing the entire project!


GIPHY App Key not set. Please check settings