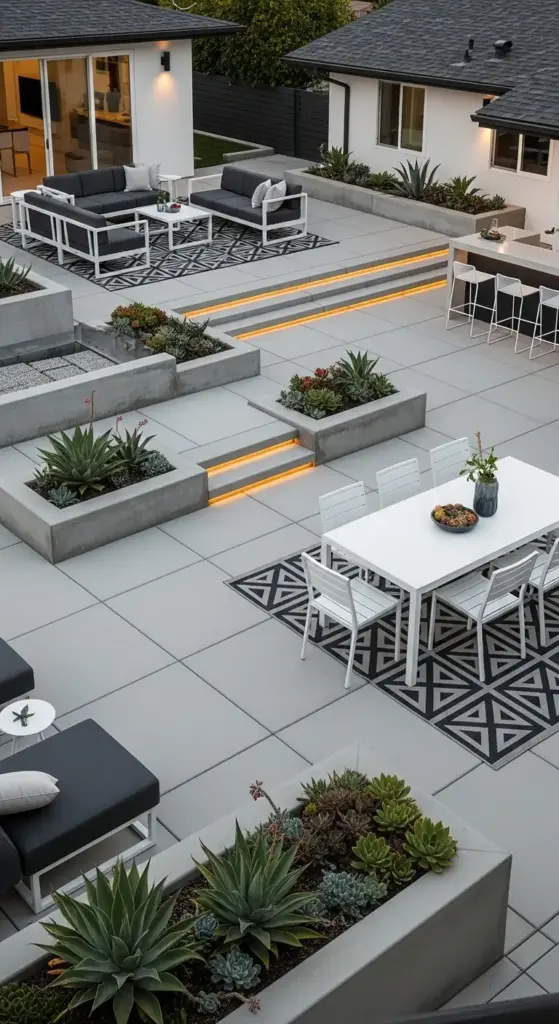
2. Modern Minimalist Concrete Patio
After living with my Mediterranean oasis for two years, I started craving something completely different. Clean lines, sleek surfaces, and that ultra-modern aesthetic you see in design magazines.
So I decided to tackle the side yard with a modern minimalist concrete patio. Let me tell you, this was a whole different beast than my first project.
The learning curve was steep, but the results? Absolutely stunning.
Selecting Sleek Concrete Slabs
Here’s my biggest rookie mistake – I thought all concrete slabs were basically the same. Boy, was I wrong.
I initially ordered standard 12×12 concrete pavers from my local supplier. When they arrived, they looked chunky and residential, not sleek at all.
Large format concrete slabs are what you need for that modern look. I’m talking 24×24 inches minimum, preferably 36×36 if your budget allows.
The key is finding slabs with clean geometric lines and minimal texture. I went with a smooth, light gray finish that has just a hint of aggregate showing through.
Thickness matters too. Standard pavers are usually 2 inches thick, but for that contemporary look, you want at least 3-inch thick slabs. They feel more substantial underfoot and look way more expensive.
Cost-wise, expect to pay $4-8 per square foot for quality large format concrete slabs. It’s less than natural stone but more than basic pavers.
Built-in Planters That Actually Work
This is where I got really excited and almost ruined everything. I wanted built-in planters so badly that I started digging without proper planning.
Three days of backbreaking work later, I realized my drainage was completely wrong.
Built-in planters need serious drainage consideration. I ended up installing a French drain system underneath each planter box to prevent water damage to my concrete.
The planters themselves are made from poured concrete to match the patio slabs. Each one is 18 inches deep and 24 inches wide – perfect for architectural plants.
I learned that succulents need way less water than I thought. My first batch died from overwatering because I was treating them like regular garden plants.
Now I stick to drought-tolerant succulents like agave, echeveria, and jade plants. They look incredible against the gray concrete and require almost zero maintenance.
Contemporary Furniture in Neutral Tones
Finding the right contemporary outdoor furniture was harder than I expected. Everything was either too traditional or ridiculously expensive.
I made the mistake of buying a bright blue sectional thinking it would “pop” against the concrete. It looked like a swimming pool float had crash-landed on my patio.
Neutral tones are absolutely essential for the minimalist look. I ended up with a charcoal gray modular seating set and a white powder-coated aluminum dining table.
The beauty of neutral furniture is that you can add color through accessories. I use bright throw pillows that I can swap out seasonally.
Weather resistance is crucial with modern furniture. Look for powder-coated aluminum frames and solution-dyed acrylic fabrics. They maintain their color and shape much better than cheaper alternatives.
My dining set cost around $1,200, and the lounge furniture was $800. Not cheap, but it’s held up beautifully for three years now.


LED Strip Lighting for Evening Drama
Regular string lights would’ve completely ruined the modern aesthetic I was going for. LED strip lighting was the answer, but installation was trickier than I anticipated.
I initially tried to install the strips myself and ended up with uneven lighting and visible wires everywhere. Not the clean look I was after.
Professional installation was worth every penny. The electrician ran the wiring underground and installed the LED strips in recessed channels along the edges of my concrete slabs.
The result is this incredible ambient lighting that makes the patio glow from within. It’s like something out of a high-end hotel.
I went with warm white LEDs (3000K color temperature) because pure white looked too clinical. The strips are dimmable too, which is perfect for different moods.
Total cost for professional LED installation was $1,800, but it completely transformed how the space looks at night.
Creating Defined Zones
One big concrete slab can feel like a parking lot if you don’t break it up properly. Defined zones are essential for making the space feel intentional and livable.
I use different levels to separate my dining and lounging areas. The dining zone is raised about 6 inches higher than the main patio level.
Outdoor rugs help define spaces too. I have a large gray geometric rug under my lounge seating and a smaller one under the dining table.
The key is making sure each zone has a clear purpose. My dining area seats six people comfortably, while the lounge zone is perfect for casual conversation or reading.
I also created a small “bar zone” with a concrete counter and two bar stools. It’s become everyone’s favorite spot during parties.
Budget-Friendly DIY Installation Tips
Here’s the truth – I tried to DIY the entire project initially and it was a disaster. But there are definitely parts you can tackle yourself to save money.
Site preparation is something you can absolutely do yourself. I rented a plate compactor for $40 and spent a weekend getting the base perfectly level.
The concrete slabs themselves? Get them professionally installed. I learned this after cracking two expensive slabs trying to maneuver them myself.
You can save money on the built-in planters by using concrete blocks and stucco instead of poured concrete. It looks nearly identical when finished but costs about 60% less.
Furniture assembly is obviously DIY territory. Most contemporary outdoor furniture comes flat-packed anyway.
For the LED lighting, you can install the strips yourself if you’re comfortable with basic electrical work. Just make sure to use outdoor-rated components and proper waterproof connections.
My biggest money-saving tip? Buy materials during off-season sales. I got my concrete slabs for 30% off in November when nobody else was thinking about patio projects.
The total DIY portions saved me about $3,500 compared to full professional installation.
Ready to discover the charm of a Rustic Farmhouse Brick Patio that’ll make your home feel like a cozy countryside retreat? Click “next” below to learn how reclaimed brick and vintage touches can add instant character – plus I’ll reveal the herb garden mistake that actually made my patio smell amazing by accident!


GIPHY App Key not set. Please check settings