3 Easy Backyard Layout Hacks That Make a Huge Difference
Okay, I have to be upfront with you about something.
These aren’t revolutionary secrets that took decades to discover. They’re actually pretty simple. But that’s exactly what makes them so powerful — because simple is what actually gets done, especially when you’re busy, overwhelmed, or just starting out.
I’ve shared these three hacks with friends, neighbors, and fellow gardeners over the years. And every single time, the response is the same. “Why didn’t anyone tell me this sooner?”
So consider this me telling you sooner. Let’s get into it. 🌿
Why Most Backyard Layouts Fail Before They Even Start
Here’s the honest truth about why so many DIY garden projects end in frustration.
It’s not lack of effort. It’s lack of a framework.
Most people start with plants — they fall in love with something at the nursery, bring it home, find a spot that looks about right, and plant it. Then they do it again. And again. Six months later they have a collection of plants that don’t relate to each other, don’t work with the space, and require way more maintenance than expected.
These three hacks give you that framework. They’re the shortcut between “I have a backyard” and “I have a garden I’m genuinely proud of.”
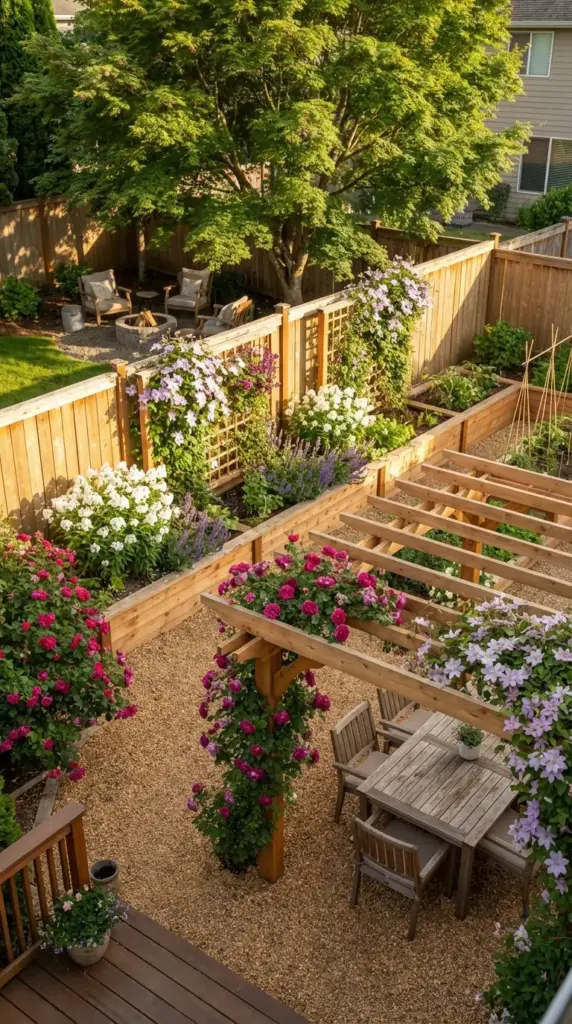
Hack #1 — The Zones-First Method
What It Is and Why It Works
The Zones-First Method is exactly what it sounds like.
Before you buy a single plant, before you move a single shovel of soil — you map your activity zones first.
I know we touched on zones earlier in this guide. But this hack takes it a step further. It’s not just about identifying zones — it’s about committing to them on paper before anything goes in the ground. That commitment is what eliminates what I call layout regret — that sinking feeling when you realize your beautiful garden bed is blocking the path everyone actually uses, or your relaxation corner gets zero afternoon shade.
Layout regret is expensive. It costs time, money, and motivation. The Zones-First Method prevents it almost entirely.
How to Actually Do It
Here’s the exact process. It takes about an hour and saves you months of frustration.
Step one — observe before you plan. Spend one full week just watching how your family actually uses the backyard. Where do the kids naturally run? Where does the dog pace? Where do you instinctively stand when you’re outside talking to a neighbor? These natural traffic patterns are telling you something important — and your layout should work with them, not against them.
Step two — mark your zones with stakes and string. Before anything gets planted or built, physically mark out your zones in the actual yard using garden stakes and twine. Walk through the space. Sit in your proposed relaxation zone. Stand at your proposed dining area. Does it feel right? Is there enough room? Is the sun hitting it the way you expected?
This step feels a little silly. Do it anyway. I can’t tell you how many times I’ve moved a zone marker two feet to the left during this process and been so glad I did it before pouring a concrete patio or building a raised bed.
Step three — live with it for a few days. Leave those stakes and strings in place for three to five days before committing to anything. Walk past it in the morning. Look at it from your kitchen window. You’ll notice things you didn’t see on day one — like the fact that your proposed garden zone is actually in the shadow of your neighbor’s fence by 3pm, or that your dining zone is right next to the HVAC unit that runs constantly in summer.
Step four — then and only then, start building and planting. Once your zones feel right in real life — not just on paper — you have permission to start. Everything you plant and build from this point forward has a home that makes sense.
Real Results From the Zones-First Method
A friend of mine in suburban Atlanta completely transformed her backyard using this exact process.
She had a medium-sized yard — about 1,200 square feet — that felt chaotic and unusable despite having decent bones. She’d planted things randomly over three years and ended up with a yard that looked busy but felt purposeless.
She spent one weekend staking out four zones: a dining area near the back door, a play zone for her two kids in the far corner, a garden bed zone along the sunny south-facing fence, and a small fire pit relaxation zone. She moved the stakes three times before it felt right.
Then she built around those zones — a simple gravel patio for dining, a raised bed kit along the fence, a mulched play area with a swing set, and a gravel circle with a fire pit. Same yard. Completely different feeling. She told me it was the first time her backyard felt like a room instead of just a space behind her house.
Hack #2 — The Vertical Garden Trick
The Small Space Game Changer
If you have a small backyard — and especially if you’re in a city like New York, Chicago, or Philadelphia — this hack is going to feel like discovering a cheat code.
Most gardeners think in two dimensions. They look at their yard and see square footage. The Vertical Garden Trick teaches you to think in three dimensions — and suddenly a tiny urban backyard has dramatically more growing and design potential than you ever realized.
Here’s the core idea: every vertical surface in your yard is potential garden space. Fences, walls, pergola posts, trellises, arbors — all of it can grow plants. And vertical plantings don’t just add growing space. They add height, drama, privacy, and that lush, layered look that makes a garden feel designed rather than planted.
Three Ways to Use Vertical Space
Option one — trellises and climbing plants.
A simple wooden or metal trellis mounted to a fence or wall and planted with a climbing vine is one of the highest-impact, lowest-cost garden upgrades you can make. We’re talking $20 to $50 for the trellis and $15 to $30 for the plant.
The best climbing plants for vertical gardens depend on your zone and sun exposure:
For full sun: Clematis is probably the most popular choice — it comes in hundreds of varieties, blooms prolifically, and grows 8 to 12 feet in a single season. Climbing roses are stunning but require more maintenance. Black-eyed Susan vine (Thunbergia alata) is a cheerful, fast-growing annual that blooms all summer and is perfect for beginners.
For partial shade: Climbing hydrangea (Hydrangea anomala petiolaris) is slow to establish but absolutely spectacular once it gets going — it can cover an entire fence in a few years with gorgeous white lacecap blooms. Honeysuckle is fast-growing, fragrant, and attracts hummingbirds. Just make sure you choose a native variety — Japanese honeysuckle is invasive in many parts of the U.S.
For shade: Virginia creeper and climbing euonymus both handle deep shade beautifully and provide incredible fall color.
Option two — wall-mounted pocket planters and vertical garden systems.
These are especially popular in urban backyards where fence space is limited and you want maximum impact in minimum square footage.
Felt pocket planters mounted to a fence or wall can hold 20 to 30 plants in a 4-square-foot footprint. They’re perfect for herbs, strawberries, lettuce, and small flowering annuals. A basic felt pocket planter system costs around $20 to $40 and can be installed in about 30 minutes.
Pallet gardens — a wooden shipping pallet mounted vertically on a fence or wall and filled with potting mix and plants — are one of the most popular DIY vertical garden projects right now. They’re practically free if you can find a pallet (check Facebook Marketplace or behind hardware stores), and they look absolutely gorgeous planted with a mix of herbs, succulents, or trailing flowers.
For a more polished look, modular wall planter systems like the Woolly Pocket or the Florafelt system give you a clean, architectural vertical garden that looks genuinely high-end. Prices start around $60 to $80 for a basic panel — worth it if aesthetics are a priority.
Option three — pergolas, arbors, and overhead structures.
This is the vertical trick that completely transforms the feeling of an outdoor space.
A pergola or garden arbor adds vertical structure that makes a flat backyard feel like an outdoor room. It creates a sense of enclosure and intimacy that no amount of ground-level planting can replicate. And when you add climbing plants — wisteria, climbing roses, clematis, or hops — it becomes something genuinely magical.
A basic cedar garden arbor costs around $150 to $300 as a kit and can be assembled in a weekend. A freestanding pergola kit runs $500 to $1,500 depending on size and material — a bigger investment, but one that adds serious value to your outdoor space and your home.
Why This Hack Works So Well for Small Spaces
Here’s the design principle behind the Vertical Garden Trick.
Vertical elements draw the eye upward, which makes a small space feel larger. It’s the same reason interior designers use tall bookshelves and floor-to-ceiling curtains in small rooms — height creates the perception of space.
In a small urban backyard, a bare fence makes the space feel like a box. A fence covered in climbing plants or wall planters makes it feel like a garden room. Same square footage. Completely different experience.


Real Results From the Vertical Garden Trick
A reader in Brooklyn shared her backyard transformation with me that perfectly illustrates this hack.
She had a 15×20 foot backyard — tiny by most standards — with a 6-foot wooden privacy fence on three sides. The space felt claustrophobic and dark, and she’d basically given up on making it feel like a real garden.
She installed three simple cedar trellises along the sunniest fence panel and planted clematis ‘Jackmanii’ at the base of each one. She mounted a felt pocket planter system on the shadier fence and filled it with herbs and trailing nasturtiums. And she added a small cedar arbor over the back gate draped in climbing roses.
By midsummer, her tiny Brooklyn backyard looked like something out of a magazine. Same square footage. Completely transformed. She told me the vertical elements made the space feel three times larger — and she was growing more plants than she ever had in the ground.
Hack #3 — The Color Anchor Strategy
The Designer Secret That Costs Nothing Extra
This is my absolute favorite hack. And it’s the one that makes the biggest visual difference for the least amount of effort.
Here’s the problem with most DIY gardens — and I say this with complete love because I did this for years.
We buy plants we love individually. A purple salvia here. A pink peony there. Some orange marigolds because they were on sale. A red knockout rose because it looked amazing at the nursery. And then we wonder why our garden looks busy and chaotic instead of cohesive and designed.
The answer is almost always color. Specifically, the lack of a deliberate color strategy.
The Color Anchor Strategy fixes this with one simple rule: choose three colors and repeat them throughout your entire garden.
How to Choose Your Three Colors
Start with one anchor color — this is your dominant color, the one that will appear most frequently throughout your garden. It should be a color you genuinely love and that works with your home’s exterior.
Then choose one supporting color that complements your anchor. If your anchor is purple, your supporting color might be soft pink or white. If your anchor is yellow, your supporting color might be deep blue or orange.
Finally, choose one accent color — used sparingly for pops of contrast and visual interest. This is the color that makes people stop and look.
Some combinations that work beautifully:
Purple + white + soft yellow — classic, elegant, works with almost any home style. Think lavender, white phlox, and yellow coreopsis repeated throughout the garden.
Deep pink + burgundy + silver — rich, romantic, and stunning in cottage or formal garden styles. Pink knockout roses, burgundy heuchera, and silver artemisia make a gorgeous trio.
Yellow + orange + deep blue — warm, vibrant, and incredibly cheerful. Black-eyed Susans, orange lantana, and blue salvia repeated through the garden creates a cohesive, high-energy palette that looks intentional and designed.
White + green + soft blue — fresh, clean, and works beautifully in modern or minimalist garden styles. This palette photographs incredibly well, which is a bonus if you’re an Instagram gardener.
How to Actually Implement the Strategy
Here’s the key to making this work: repetition, not concentration.
Don’t plant all your purple in one bed and all your yellow in another. Repeat each color in multiple locations throughout the garden. A clump of purple salvia in the back left bed, another near the front pathway, and a third in a container on the patio. Your eye connects those three points and the whole garden suddenly feels unified and intentional.
This is exactly what professional landscape designers do — and it’s why their gardens always look cohesive even when they’re using dozens of different plant varieties. The color palette is the thread that ties everything together.
A practical tip for implementation: before you buy any new plants, take a photo of your existing garden and pull the dominant colors from it. Build your three-color palette around what’s already there rather than starting from scratch. This saves money and creates continuity.
The “Color Anchor” Part of the Strategy
The “anchor” in Color Anchor Strategy refers to one specific technique that takes this hack to the next level.
Choose one plant variety in your anchor color and use it in every single garden zone.
For example, if purple is your anchor color and ‘May Night’ salvia is your anchor plant — put it in your front border, your back garden bed, your container arrangements, and along your pathway. Same plant, same color, appearing throughout the entire space.
This single technique creates a sense of intentional design that most people can’t quite put their finger on but immediately respond to. It’s the garden equivalent of a consistent color palette in interior design — it just makes everything feel like it belongs together.
Why These Hacks Work Especially Well for Beginners
Here’s what all three of these hacks have in common.
They give you a decision-making framework before you’re standing in a garden center feeling overwhelmed.
The Zones-First Method tells you where things go. The Vertical Garden Trick tells you how to maximize your space. The Color Anchor Strategy tells you what to buy. Together, they eliminate the three biggest sources of beginner garden frustration — layout regret, wasted space, and visual chaos.
They also work beautifully for time-strapped gardeners because they reduce the number of decisions you have to make in the moment. When you already know your zones, your vertical plan, and your color palette — shopping for plants takes 20 minutes instead of two hours. Maintenance is easier because everything has a place. And the garden looks more cohesive with less effort because the framework is doing the heavy lifting.
Real Results: What Happens When You Use All Three Together
The most dramatic backyard transformation I’ve personally witnessed used all three of these hacks together — and the results were genuinely jaw-dropping.
A friend in Minneapolis had a medium-sized suburban backyard that she described as “a grassy rectangle of disappointment.” Her words, not mine. She’d tried gardening before but always felt overwhelmed and ended up abandoning projects halfway through.
She started with the Zones-First Method — spending a full weekend staking out a dining zone near the house, a garden zone along the sunny south fence, and a relaxation zone in the far corner under a mature maple tree. She moved the stakes four times before it felt right.
Then she applied the Vertical Garden Trick — installing two cedar trellises along the fence in her garden zone and planting clematis and climbing roses at the base of each one. She also added a simple arbor between her dining zone and garden zone to create a sense of transition between spaces.
Finally, she built her entire plant palette around the Color Anchor Strategy — choosing deep pink, white, and soft purple as her three colors. She used pink knockout roses as her anchor plant, repeating them in the garden zone, in containers on the dining patio, and in a small bed near the arbor.
By midsummer of her first full season, her backyard was unrecognizable. Cohesive, lush, layered, and — most importantly — manageable. She spent about 20 minutes a week maintaining it. Her neighbors started asking who her landscaper was.
She did it herself. With three simple hacks and a plan.
The Takeaway
You don’t need a design degree. You don’t need an unlimited budget. You don’t even need a lot of time.
What you need is a framework — a way of making decisions before you’re standing in a garden center with a cart full of impulse purchases and no plan.
Map your zones first. Go vertical. Anchor your colors. Do those three things and your garden will look more intentional, more cohesive, and more beautiful than you ever thought possible on a DIY budget.
That’s the whole secret. It really is that simple.
🌸 You’re almost at the finish line — and the last section is all about YOU. We’re wrapping up with how to add your own personal style and home decor touches to your garden — because your outdoor space should feel like an extension of your personality, not just a collection of plants. From outdoor lighting to DIY garden decor projects to styling your space for entertaining, this final section is where your garden goes from beautiful to truly yours. Hit that Next button — let’s make it personal! ✨🏡


GIPHY App Key not set. Please check settings