Designing Your Backyard Layout: Step-by-Step Planning Guide
Okay, this is the section I wish I had when I first started.
Because honestly? Designing a backyard layout sounds intimidating until someone just walks you through it. And that’s exactly what we’re doing today — step by step, no overwhelm, no fancy design degree required.
Grab a cup of coffee. Let’s do this. ☕
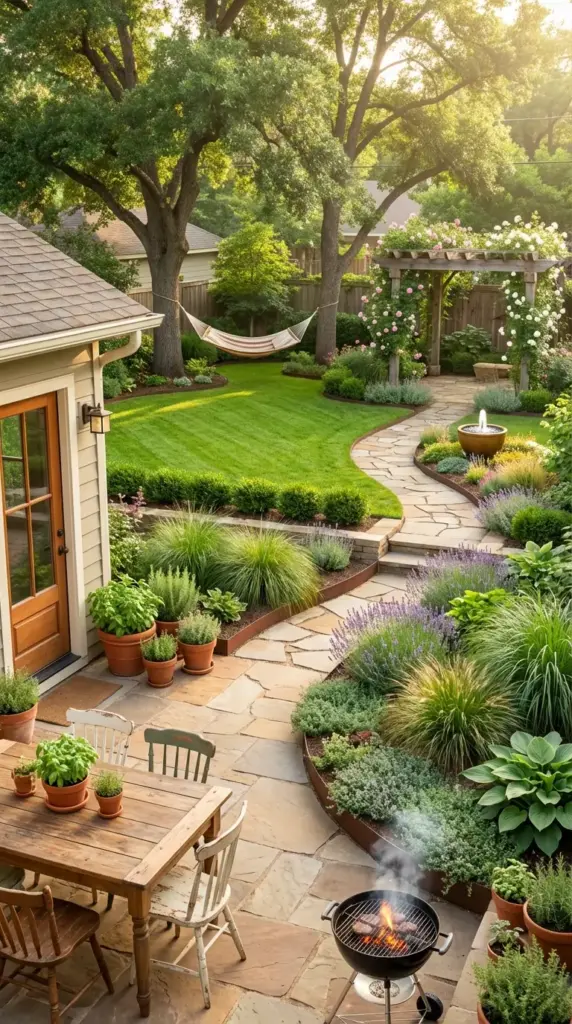
Step One: Divide Your Backyard Into Functional Zones
This is the single most important thing you can do before anything else.
Think of your backyard the same way you think about the rooms in your house. You wouldn’t put your dining table in the middle of your bedroom, right? Same logic applies outside.
Start by asking yourself how you actually want to use your outdoor space. Most backyards benefit from four core zones:
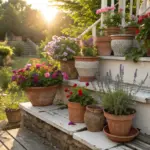
The dining and entertaining zone — close to the house, ideally near a back door for easy access to the kitchen. This is where your patio furniture, grill, and outdoor rug live.
The garden zone — the area dedicated to your actual planting beds, raised beds, or borders. This should be placed based on sun exposure first, not just wherever looks good on paper.
The relaxation zone — a hammock corner, a reading nook, a fire pit area. Somewhere that feels like a retreat. Every backyard needs at least one of these.
The play or utility zone — if you have kids or pets, this space matters a lot. Keep it open, keep it safe, and keep it away from your most delicate plantings.
How Much Space Should Each Zone Get?
Here’s a rough guideline that works for most average-sized backyards.
For a typical suburban backyard around 1,000 to 1,500 square feet, I’d suggest allocating roughly 30% to hardscape and entertaining areas, 40% to lawn or open space, and 30% to garden beds and plantings. These aren’t rigid rules — but they give you a starting point that feels balanced.
Smaller urban yards in places like Chicago or Philadelphia might flip that ratio, leaning heavier on garden beds and vertical elements to maximize every inch.
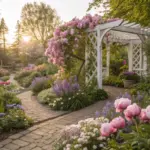
Using Pathways, Borders, and Edging to Create Visual Flow
Here’s something a landscape designer told me once that I never forgot.
“Pathways tell people where to go. Borders tell plants where to stop.”
Both are essential to a cohesive garden layout. Without them, even the most beautiful planting scheme can look unfinished and chaotic.
Garden pathways don’t have to be expensive. Stepping stones set into gravel, a simple mulch path, or even a row of flat pavers creates instant structure and visual flow. The key is making your pathways wide enough to actually walk comfortably — at least 18 to 24 inches for a single-person path, 36 inches or more for a main walkway.
Garden edging is the detail that separates a DIY garden from one that looks professionally designed. Steel edging gives a clean, modern look. Natural stone edging feels more organic and cottage-style. Even a simple plastic edging strip, installed properly, makes a dramatic difference in how polished your beds look.
The Secret Power of Curved vs. Straight Lines
This is a design detail most people don’t think about — but it changes everything.
Straight lines and geometric shapes feel formal, modern, and structured. They work beautifully with contemporary homes and minimalist garden styles.
Curved borders and winding pathways feel relaxed, natural, and romantic. They make small spaces feel larger because the eye follows the curve and keeps moving through the space.
My personal rule? Use curves in the garden beds and straight lines in the hardscape. It creates a beautiful tension between structure and softness that always looks intentional.
Balancing Hardscape vs. Softscape Elements
Let’s talk about one of the most common backyard design mistakes I see.
Too much hardscape — all patio, no plants — feels cold and uninviting. Too much softscape — all plants, no structure — feels wild and hard to maintain. The magic is in the balance.


Hardscape elements include patios, pathways, retaining walls, pergolas, fences, and any built structures. Softscape elements are everything living — your lawn, garden beds, trees, shrubs, and ground covers.
A good rule of thumb for a polished, designer look: for every large hardscape element, add at least two softscape elements to frame or soften it. A concrete patio looks stunning when it’s bordered by lush planting beds on two sides. A wooden pergola becomes magical when climbing roses or wisteria start to grow up and over it.
Incorporating Focal Points Into Your Layout
Every great garden has at least one focal point — something that draws your eye and anchors the whole design.
And it doesn’t have to be expensive. Some of the best focal points I’ve ever seen cost almost nothing.
A water feature is probably the most impactful focal point you can add. Even a small solar-powered fountain in a large ceramic pot creates movement, sound, and a sense of calm that transforms a space. Prices start around $40 to $60 for a basic solar fountain kit — totally worth it.
Raised planters used as focal points are having a huge moment right now. A tall, dramatic planter filled with ornamental grasses and trailing plants at the end of a pathway creates a natural stopping point that feels intentional and designed.
Trellises and arbors are another favorite. A simple wooden arbor draped in climbing hydrangea or clematis creates a wow moment that costs a few hundred dollars and lasts for decades.
Designing With Color, Texture, and Height Variation
Okay, this is where garden design gets really fun.
Think of your garden beds like a painting. You need foreground, middle ground, and background — and the same applies to plants.
Height variation is the backbone of a beautiful planting scheme. Place your tallest plants — ornamental grasses, tall perennials, shrubs — at the back of the bed or in the center if it’s a freestanding island bed. Medium-height plants go in the middle. Low ground covers and edging plants go at the front. Simple, but so effective.
Texture variation is what makes a garden look lush and layered even when nothing is blooming. Mix fine, feathery textures like ornamental grasses or fennel with bold, broad-leafed plants like hostas or elephant ears. The contrast is what creates visual interest.
For color, the easiest approach is to pick a palette of three colors and repeat them throughout your garden. Maybe it’s deep purple, soft pink, and white. Maybe it’s yellow, orange, and burgundy. Repetition creates cohesion — it’s the difference between a garden that looks designed and one that looks like a random collection of plants.
Free and Budget-Friendly Tools for Mapping Your Garden Layout
You do not need to spend money on fancy software to plan a beautiful backyard. I promise.
Here are the tools I actually use and recommend:
Graph paper and colored pencils — old school, but genuinely effective. Draw your yard to scale (1 square = 1 foot works great), sketch in your zones, and use colored pencils to map out planting areas. Takes about an hour and costs nothing.
iScape (free version available) — a really intuitive app that lets you upload a photo of your yard and drag-and-drop plants and features into the space. Great for visualizing before you commit.
Garden Planner by Gardeners’ World — excellent for vegetable garden layouts and raised bed planning specifically. The free trial gives you enough time to plan a full season.
Canva — yes, the graphic design tool. Surprisingly great for creating simple, visual garden layout maps using shapes and color blocks. Free and easy to use.
Google Earth — pull up a satellite view of your property, screenshot it, and use it as your base map. This is honestly one of my favorite hacks for getting accurate proportions without measuring every inch.
Putting It All Together
Here’s the thing about backyard layout design — it doesn’t have to be perfect on the first try.
Start with your zones. Add your pathways. Find your focal point. Then start layering in the plants and details. Great gardens evolve over time, and the best ones are always a work in progress.
The goal isn’t a perfect garden. The goal is a garden that feels like yours.
🌸 You’re going to love what’s coming next. Now that your layout is planned, it’s time to talk about the part everyone’s been waiting for — the plants. In the next section, we’re diving deep into planting strategies that bring your garden layout to life. We’re covering everything from layering plants by height to seasonal planting tips for your specific region. It’s basically a masterclass in making your garden look full, lush, and gorgeous all year long. Hit that Next button — let’s get planting! 🌱


GIPHY App Key not set. Please check settings