How to Assess Your Backyard Space Before You Start Designing
Okay, so you’re ready to design your dream backyard. Slow down just a second.
Before you Pinterest-spiral into raised beds and fairy lights, there’s some homework to do first. And trust me — I learned this the hard way.
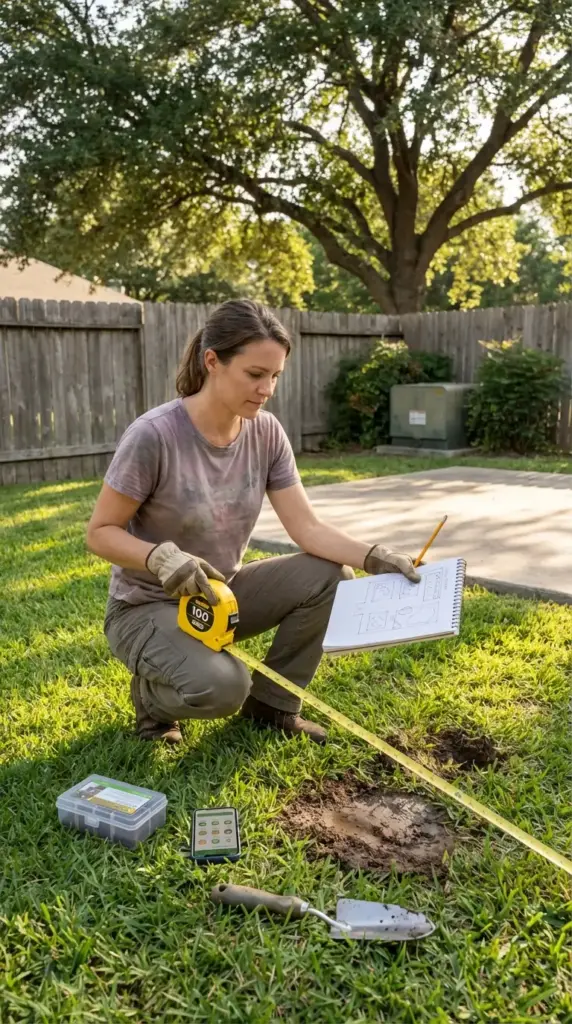
Measure Your Yard (Yes, Actually Measure It)
The first time I “eyeballed” my backyard dimensions, I ended up ordering a pergola kit that was four feet too wide. Four feet. It sat in my garage for two months before I returned it.
Measuring your yard accurately is the unglamorous first step that saves you from expensive, embarrassing mistakes like that.
Here’s what you need: a 100-foot measuring tape, a notepad, and about 30 minutes. Measure the full length and width of your yard, then note any irregular angles or bump-outs along the fence line.
Creating a Simple Scaled Sketch or Digital Map
You don’t need to be an architect. Seriously, don’t overthink this.
Draw your yard on graph paper using a simple scale — like 1 square = 1 foot. Mark where your house sits, where the fence lines are, and any existing features like a patio or big tree.
If you’re more of a tech person, free tools like iScape or Garden Planner let you build a digital garden map right on your phone. I’ve used both and honestly, even a rough hand-drawn sketch works just as well for most DIY landscape projects.
Identifying Sun Exposure and Shade Zones
This one is so important and so many people skip it.
Sun exposure determines everything — what plants will thrive, where your vegetable garden should go, and which corners of your yard will stay cool in summer. Walk your yard at three different times: 9am, 12pm, and 4pm. Note where the sun hits and where it doesn’t.
Areas that get 6+ hours of direct sunlight are considered full sun. 4 to 6 hours is partial sun. Anything less than that is shade — and your plant choices need to reflect that.
Understanding Microclimates in Your Space
Here’s a term that sounds fancy but is actually super practical: microclimates.
A microclimate is basically a small area in your yard that has slightly different conditions than the rest. That spot right next to your brick wall? It’s probably warmer and drier. The low corner near the fence where water pools after rain? That’s a cooler, wetter microclimate.
Knowing your microclimates helps you place plants where they’ll actually want to grow — instead of fighting their environment every single season.
Evaluating Soil Quality and Drainage
I ignored my soil for two full growing seasons. Two! And I wondered why my plants looked sad and stunted every year.
Soil quality is the silent factor behind every thriving garden. The good news? Testing it is cheap and easy. A basic soil test kit from your local garden center costs around $15 to $20, and it’ll tell you your soil’s pH level, nitrogen content, and nutrient balance.


Most vegetables and flowering plants prefer a pH between 6.0 and 7.0. If your soil is too acidic, you add lime. Too alkaline? Sulfur brings it down. Simple fixes once you know what you’re dealing with.
Checking Your Drainage Situation
Drainage is the thing nobody thinks about until their garden beds are underwater.
Here’s a quick test: dig a hole about 12 inches deep, fill it with water, and see how long it takes to drain. If it’s still sitting there after an hour, you’ve got a drainage problem that needs to be addressed before you plant anything.
Poor garden drainage leads to root rot, fungal issues, and dead plants — no matter how good your layout is. Raised beds are honestly one of the easiest fixes for this, especially in yards with heavy clay soil.
Taking Stock of Existing Features
Before you start dreaming about what to add, take a good look at what’s already there.
Fences, mature trees, patios, sheds, utility boxes — all of these are part of your design whether you like it or not. That big oak tree in the corner isn’t going anywhere, so design around it instead of fighting it. Use the shade it creates as a feature, not a problem.
Existing patios and hardscape elements can anchor your layout and save you money. Work with what you’ve got before spending on new structures.
Understanding Your Climate Zone
This part is especially important if you live somewhere with extreme seasonal shifts — and I’m looking at you, Minneapolis, Seattle, and Atlanta.
The USDA Plant Hardiness Zone Map divides the U.S. into zones based on average minimum winter temperatures. Minneapolis sits in Zone 4b to 5a — meaning brutal winters that will kill plants not rated for cold hardiness. Seattle is a mild Zone 8b, with wet winters and dry summers that favor totally different plant choices. Atlanta? Zone 7b to 8a — hot, humid summers with mild winters.
Planting outside your zone is one of the most common — and costly — beginner mistakes. Always check the zone rating on plant tags before you buy.
One More Thing Before You Move On
Assessing your space isn’t the most exciting part of backyard garden design. I get it.
But every single stunning garden you’ve ever seen on Instagram or Pinterest started with someone who understood their space first. The layout, the plants, the whole vibe — it all flows from this step.
Take the time. Do the homework. Your future garden will thank you.
🌱 Up next — and this one is SO fun. We’re diving into how to choose the right garden type for your lifestyle and space. Cottage garden? Raised bed? Zen retreat? Kitchen garden? We’re breaking down all the options so you can find the style that actually fits your life — not just looks good on a mood board. Hit that Next button and let’s find your garden personality! 🌸


GIPHY App Key not set. Please check settings