7. The Healing Garden: Medicinal Rosemary Arrangements
I never really understood why my grandmother always had bundles of rosemary hanging in her kitchen until I started researching medicinal herb gardens. Turns out, she was following traditions that monasteries have used for over a thousand years.
My first attempt at a healing rosemary garden was pretty chaotic – I just planted different varieties randomly and hoped for the best. Big mistake.
Now I have this organized, purposeful space that not only looks beautiful but actually functions like the monastery herb gardens that inspired it.
Organizing Varieties by Healing Properties
Traditional rosemary medicine uses different varieties for specific purposes, and organizing them properly makes all the difference.
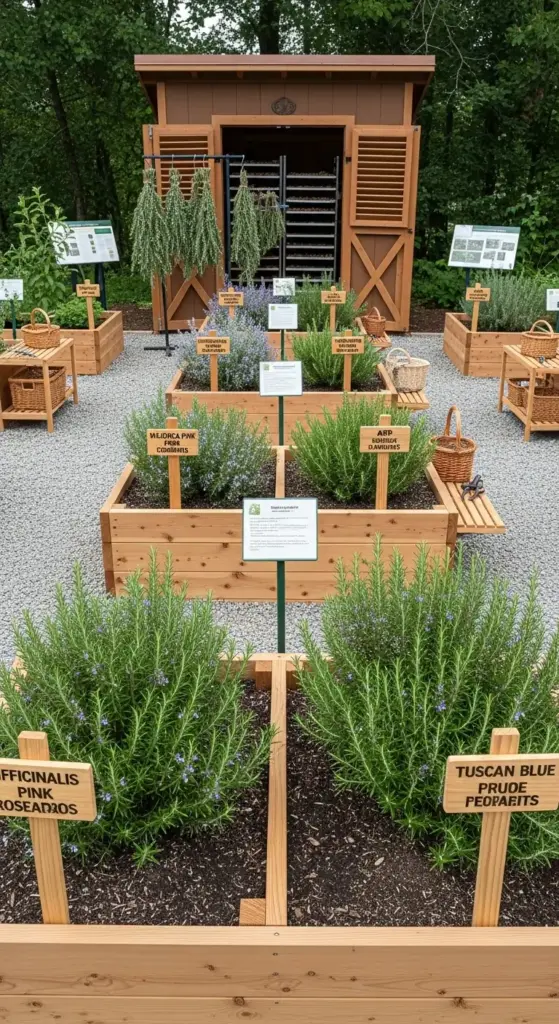
I created separate sections based on the primary uses. My ‘Officinalis’ rosemary (the classic medicinal variety) gets the prime spot because it has the highest concentration of active compounds.
For memory and mental clarity, I planted ‘Majorca Pink’ and ‘Tuscan Blue’ together. These varieties have higher levels of the compounds that support cognitive function.
The digestive section features ‘Arp’ and ‘Hill Hardy’ rosemary – these are traditionally used for stomach issues and have a milder flavor that’s easier to tolerate.
Topical use varieties like ‘Prostratus’ get their own area near my drying station. The oils in these are perfect for making salves and infused oils.
I learned to keep detailed notes about which varieties work best for different purposes. Trial and error taught me more than any book.
Creating Dedicated Harvesting and Drying Spaces
My first herb drying setup was just bundles hanging from my kitchen ceiling. It looked messy and took forever to dry properly.
Now I have a dedicated drying shed that’s basically a modified garden shed with excellent ventilation. Cost me about $400 to build and it’s been a game-changer.
The key is airflow and protection from direct sunlight. I installed louvered vents on opposite walls and added screens to keep insects out.
Drying racks made from old window screens work perfectly for laying out individual leaves and small sprigs. I can stack them to maximize space.
For bundle drying, I installed hooks at different heights so I can hang bundles without them touching each other.
Temperature control matters more than I realized – I added a small fan for air circulation and a thermometer to monitor conditions.
Designing Accessible Raised Beds
Accessible herb gardening became important when my mom started helping with the garden. Regular ground-level beds were too hard on her back.
I built raised beds that are 30 inches high – perfect height for comfortable harvesting without bending over. The width is 4 feet max so you can reach the center from either side.
Wheelchair accessibility was something I hadn’t considered initially. I made the paths 5 feet wide and used packed gravel for a smooth, stable surface.
The bed materials matter for medicinal herbs. I used untreated cedar because I didn’t want any chemicals leaching into plants I’d be consuming.
Corner access is crucial – I rounded all the corners so there are no sharp edges to bump into when you’re focused on harvesting.
I added a small shelf along one side of each bed for setting down harvesting baskets and tools. Such a simple addition but incredibly useful.
Educational Elements That Actually Help
Plant identification becomes super important when you’re using herbs medicinally. I learned this after almost harvesting the wrong variety for a tea blend.
My plant markers are made from cedar stakes with the information burned in using a wood-burning tool. They last for years and look natural in the garden.
Each marker includes the variety name, traditional uses, and harvest timing. I also note any safety considerations or contraindications.


Information boards at the entrance to each section explain the traditional uses and preparation methods. I laminated them so they survive weather.
I created a simple harvest calendar posted in my drying shed that shows when each variety is at peak potency. Game-changer for timing.
QR codes on some markers link to my digital notes with more detailed information about preparation methods and dosages.
Planning Succession Plantings for Continuous Harvest
Year-round rosemary availability requires planning different varieties with staggered peak harvest times.
I plant early varieties like ‘Arp’ that can be harvested starting in late spring, followed by ‘Tuscan Blue’ for summer harvest.
Fall harvesting focuses on ‘Hill Hardy’ and other cold-tolerant varieties that maintain their potency later in the season.
Succession planting means starting new plants every 6 months so I always have young, vigorous growth for the best medicinal properties.
I keep a harvest journal tracking which plants I’ve harvested from and when. This prevents over-harvesting and ensures sustainable production.
Indoor growing extends my season – I bring potted rosemary plants into my greenhouse for winter harvesting.
Monastic Storage and Preservation Techniques
Traditional preservation methods work way better than modern shortcuts, though they require more patience.
Air drying is still the gold standard for maintaining medicinal properties. I hang bundles in my drying shed for 2-3 weeks until stems snap cleanly.
Proper storage containers make a huge difference in maintaining potency. I use dark glass jars with tight-fitting lids, stored in a cool, dark cabinet.
Labeling everything with harvest date and variety prevents confusion later. I learned this after mixing up different preparations and having no idea what was what.
Oil infusions using the monastery method involve slow heating in a double boiler for several hours. Takes forever but creates incredibly potent preparations.
Tincture making follows traditional ratios – usually 1:5 herb to alcohol ratio using 40% alcohol. I use vodka because it’s neutral and readily available.
Salt preservation is an old technique I learned from monastery texts. Layering fresh rosemary with coarse sea salt creates a seasoning that lasts for years.
I keep detailed preparation logs noting methods, ratios, and results. This helps me replicate successful batches and avoid repeating mistakes.
The most important lesson from monastic traditions is patience. Rushing the drying or preparation process always results in inferior quality.
My healing garden now produces enough rosemary preparations to last all year, plus extras to share with friends and family. There’s something deeply satisfying about continuing these ancient traditions.
Conclusion
These seven monastery secrets prove that rosemary gardens can be so much more than simple herb patches – they’re living works of art that engage all your senses!
By incorporating these time-tested techniques into your own outdoor space, you’re not just creating a beautiful garden; you’re connecting with centuries of gardening wisdom and creating a peaceful sanctuary right in your backyard.
Start with just one technique that speaks to you – maybe the aromatic pathway borders or a simple contemplation circle. As you watch your rosemary garden transform, you’ll discover the same sense of peace and purpose that monastery gardeners have cultivated for generations.
Your neighbors will be asking for your secrets, and you’ll have the satisfaction of knowing you’ve created something truly special using techniques that have stood the test of time.


GIPHY App Key not set. Please check settings