6. Terraced Rosemary Sanctuaries: Multi-Level Garden Rooms
My backyard used to be this awkward sloping mess that I couldn’t figure out how to use. Every time it rained, water would rush down the hill and pool at the bottom, creating this muddy disaster.
Then I visited this incredible monastery in Greece where they’d carved these amazing terraced herb gardens right into the hillside. The way they used different levels to create separate “rooms” was absolutely genius.
That trip inspired me to completely reimagine my sloped yard. Now I have these gorgeous stepped levels that feel like outdoor rooms, each with its own personality and purpose.
Designing Stepped Gardens for Maximum Impact
Terraced garden design is all about working with your slope instead of fighting against it. I learned this the hard way after my first failed attempt.
The key is creating level areas that are at least 6 feet deep – anything less feels cramped and doesn’t give you enough planting space.
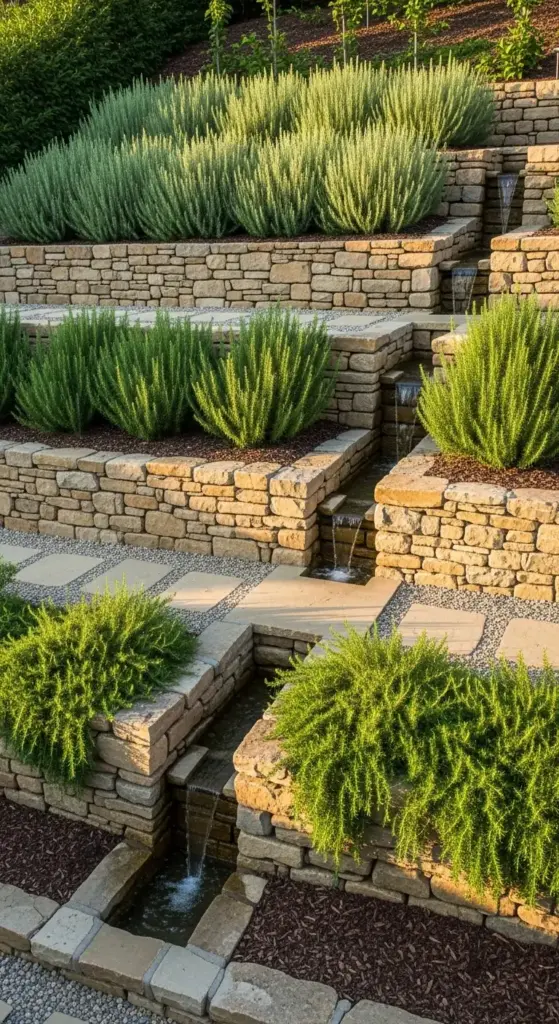
I divided my 20-foot slope into four terraces, each about 3 feet high. This created manageable levels that don’t feel overwhelming when you’re looking up from the bottom.
Step height consistency is crucial for the visual flow. I kept all my risers at exactly 8 inches, which feels natural when you’re walking between levels.
The width of each terrace varies based on the natural contours of my slope. My top terrace is 8 feet deep, while the bottom one is 12 feet deep.
Pro tip that saved me tons of work – I followed the natural grade lines instead of trying to create perfectly geometric terraces. Looks way more natural.
Selecting Rosemary for Different Elevations
Different terrace levels have completely different growing conditions, so plant selection is super important.
Top terraces get the most sun and drain the fastest. This is where I plant my Mediterranean varieties like ‘Tuscan Blue’ and ‘Miss Jessup’s Upright’ that love hot, dry conditions.
Middle levels get morning sun but some afternoon shade. Perfect for ‘Arp’ rosemary and other slightly more tolerant varieties.
The bottom terrace was tricky because it stays moister and gets less direct sun. I use ‘Hill Hardy’ rosemary here because it tolerates more moisture.
Trailing varieties work beautifully cascading over retaining walls. ‘Prostratus’ and ‘Huntington Carpet’ create this gorgeous waterfall effect.
I learned not to plant the same variety on every level – the different growing conditions mean they’ll perform differently anyway.
Creating Natural Drainage Systems
Terrace drainage was my biggest learning curve. My first attempt turned into a swamp because I didn’t think about water management.
Each terrace needs to slope slightly toward the back (about 2% grade) so water doesn’t pool on the level areas.
I installed French drains behind each retaining wall – basically trenches filled with gravel and perforated pipe that carry excess water away.
The game-changer was adding drainage channels between terraces. I created these shallow stone-lined channels that guide water flow and prevent erosion.
Gravel mulch works better than organic mulch on terraces because it doesn’t wash away during heavy rains. Plus it looks more Mediterranean.
I planted deep-rooted grasses on the slopes between terraces to prevent erosion. Buffalo grass works great and stays low-maintenance.
Building Retaining Walls That Last
My first DIY retaining walls were a disaster – I used regular concrete blocks and they started shifting within six months.
Now I use natural fieldstone with a slight backward lean (about 1 inch per foot of height). This creates stability and looks way better.


Foundation depth is crucial – I dig down at least 6 inches below grade and create a level gravel base for each wall.
The secret to stable stone walls is using the biggest, flattest stones for the bottom course. These anchor stones support everything above them.
I don’t use mortar because I want water to drain through the walls. Dry-stacked stone is more flexible and handles freeze-thaw cycles better.
Backfill drainage behind the walls prevents water pressure buildup. I use coarse gravel for the first 12 inches, then regular soil.
Each wall took me about two weekends to build, working in 20-foot sections. Slow and steady definitely wins this race.
Water Features That Enhance the Experience
Adding water elements to terraced gardens creates this incredible sensory experience that really completes the Mediterranean vibe.
I installed a simple rill system – basically a narrow water channel that flows from the top terrace to the bottom. The sound is absolutely magical.
The water source is just a small recirculating pump hidden in a reservoir at the bottom. Total cost was under $300 and it transforms the entire space.
Catch basins at each level create small pools where the water pauses before continuing down. I planted water-loving herbs like watercress in these areas.
For smaller terraces, even a simple wall fountain can add that water element. I built one using a large ceramic pot and a small pump.
The key is keeping water features simple and natural-looking. Fancy fountains look out of place in herb gardens.
Adapting Monastery Designs for Suburban Yards
Most monastery terraces were designed for huge hillsides, but you can totally scale down the concepts for regular backyards.
I took inspiration from a four-level monastery garden and adapted it to my 30×40 foot slope. The proportions work perfectly at smaller scale.
Simplified plant palettes work better in small spaces. Instead of dozens of herb varieties, I focus on 4-5 rosemary types plus a few complementary plants.
Urban lots often have drainage restrictions that monasteries didn’t worry about. I had to work with my city’s stormwater requirements.
Privacy considerations are different too. I used taller rosemary varieties on the upper terraces to screen neighboring houses.
Maintenance access is crucial in suburban settings. I made sure each terrace has a 3-foot wide path for getting equipment in and out.
Budget constraints meant I built my terraces in phases over three years. Started with the bottom level and worked my way up as finances allowed.
The monastery approach of using local materials worked perfectly – I sourced all my stone from a quarry 20 minutes away.
The most important adaptation was creating gathering spaces on each level. Monasteries were about solitude, but suburban gardens need to accommodate family life.
My top terrace has a small seating area, the middle level has space for herb drying, and the bottom terrace includes a work area for potting and maintenance.
Ready to discover the practical side of rosemary gardening? Click “next” to learn about healing gardens – these specially designed medicinal rosemary arrangements will teach you how to organize, harvest, and preserve your herbs just like monastery healers have done for centuries!


GIPHY App Key not set. Please check settings