2. Living Walls of Fragrance: Vertical Rosemary Privacy Screens
My neighbor’s ugly chain-link fence was driving me absolutely crazy. Every time I looked out my kitchen window, there it was – this eyesore that completely ruined my garden view.
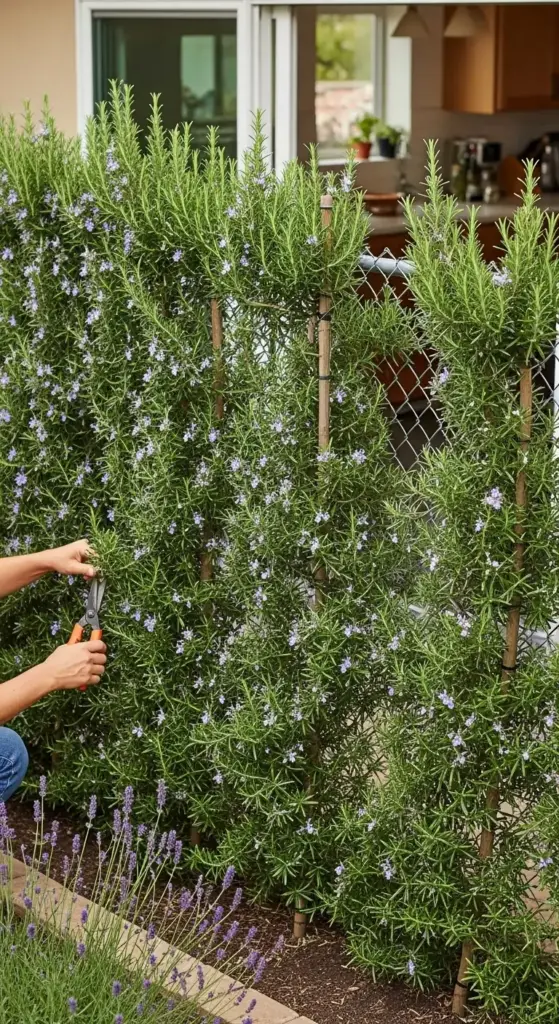
That’s when I discovered the magic of vertical rosemary hedging. Now I have this gorgeous, fragrant wall that blocks out the neighbor’s mess and fills my yard with the most incredible Mediterranean scent.
Selecting the Perfect Upright Rosemary Varieties
Here’s what I learned after killing my first attempt – not all rosemary grows tall enough for effective privacy screening.
‘Tuscan Blue’ became my go-to variety. It shoots up to 6 feet tall and 4 feet wide, creating this dense, aromatic barrier that actually works.
‘Miss Jessup’s Upright’ is another winner – it grows fast and stays narrow, perfect for tight spaces. I planted these 3 feet apart and within two years had a solid wall.
Don’t make my rookie mistake – I initially tried ‘Arp’ rosemary because it’s cold-hardy, but it only gets 3 feet tall. Great plant, wrong job.
For really tall screens, ‘Joyce DeBaggio’ can reach 8 feet in the right conditions. But honestly, it’s harder to find and more expensive.
Training Techniques for Dense Growth
This is where patience really pays off, though I’ll admit I got pretty impatient my first year.
I start training vertical rosemary when the plants are about 18 inches tall. Using bamboo stakes, I gently tie the main stems upright with soft plant ties.
The secret is pinching the growing tips every 6-8 weeks during the first two years. It feels wrong at first – like you’re stunting growth – but it forces the plant to branch out sideways.
Here’s the game-changer nobody talks about – I weave horizontal wire between the plants at 2-foot intervals. This gives the branches something to grow against and creates that dense, hedge-like appearance.
Complementary Herbs for Visual Interest
Pure rosemary walls can look a bit monotonous, so I learned to mix things up strategically.
Lavender varieties work beautifully with rosemary – similar growing needs but different textures and flower colors. I alternate ‘Hidcote’ lavender with my rosemary plants every fourth position.
Sage adds this gorgeous silvery-green contrast. ‘Berggarten’ sage stays compact and doesn’t overwhelm the rosemary’s growth pattern.
For the base of my herb privacy hedge, I plant creeping thyme. It fills in gaps and releases fragrance when you brush against it.
Pro tip from my trial and error – don’t plant mint anywhere near your rosemary screen. I made that mistake once and spent two years pulling mint runners out of everything.
Installation Methods That Actually Work
My first installation was a complete disaster because I didn’t consider my clay soil situation.


For heavy clay soils like mine, I now dig trenches 18 inches deep and 24 inches wide. I backfill with a mix of native soil, compost, and coarse sand – about 50/30/20 ratio.
Sandy soils need the opposite approach. Add compost and some clay to help retain moisture, because rosemary hedges need consistent water their first year.
I space my plants 30 inches apart for faster coverage, though 36 inches is more economical if you’re patient. Closer than 30 inches and they compete too much for nutrients.
The timing matters more than I realized – plant in early spring after last frost, or early fall if you’re in a mild climate. Summer planting is just asking for stress problems.
Seasonal Care That Keeps Them Thriving
Spring maintenance starts with a light pruning to remove any winter damage and shape the hedge. I never cut more than one-third of the growth.
Summer is all about consistent watering – about 1 inch per week including rainfall. I use soaker hoses to keep water off the foliage and prevent fungal issues.
Fall pruning is controversial, but I do a light trim in September to prevent snow damage. Just cleaning up straggly growth, nothing major.
Winter protection in cold climates means wrapping with burlap if temperatures drop below 10°F. I learned this the hard way after losing half my hedge one brutal February.
Budget-Friendly Privacy Solutions
Let’s be real – rosemary privacy fencing isn’t cheap upfront, but it’s way less expensive than traditional fencing over time.
I started with 4-inch pots instead of gallon containers and saved about $15 per plant. Takes an extra year to fill in, but the savings were worth it.
Propagating your own plants from cuttings is free but requires patience. I take 6-inch cuttings in late spring and root them in perlite – about 70% success rate.
Here’s my money-saving hack – I planted every other position first, then filled in the gaps the following year with my own propagated plants. Cut my initial costs in half.
For temporary screening while plants establish, I use bamboo screening attached to posts. Costs about $3 per linear foot and looks decent for 2-3 years.
The maintenance costs are minimal – just water, occasional fertilizer, and annual pruning. Compare that to painting or replacing wooden fencing every few years.
Want to create something even more intricate and stunning? Click “next” to discover the ancient art of monastery knot gardens – these geometric rosemary patterns will turn your yard into a living masterpiece that’ll have your neighbors stopping to stare in amazement!


GIPHY App Key not set. Please check settings