3. Windowsill Herb Box Design

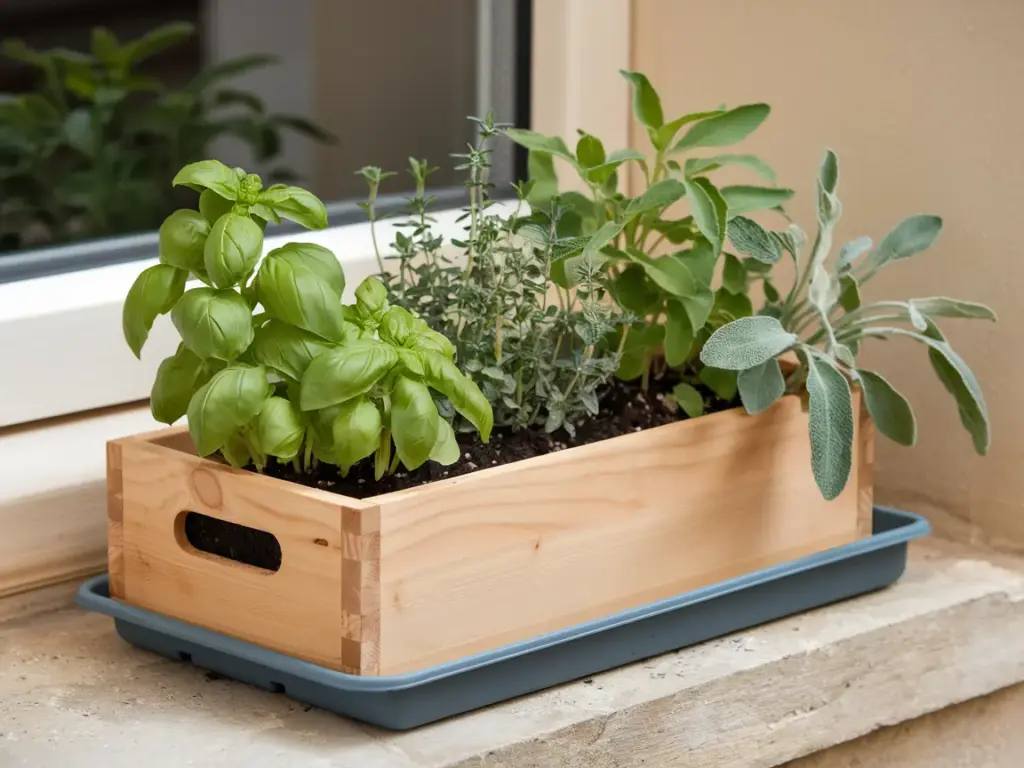
After watching my students struggle with store-bought windowsill planters that were either too small or poorly draining, I decided to create my own design. What started as a weekend project turned into my most popular gardening workshop ever! Let me share everything I’ve learned about creating the perfect windowsill herb garden.
Getting the Size Just Right
Here’s the golden ratio I swear by: For every inch of herb height, you need about an inch of soil depth. My ideal dimensions are:
- Width: 4-6 inches
- Depth: 6-8 inches
- Length: Measure your windowsill and subtract 2 inches
The biggest mistake I made with my first box? Making it too shallow. Those poor basil roots were cramped like teenagers in a mini car! Now I always err on the deeper side for healthier root systems.
Materials and Tools Selection
You’ll need:
- Cedar boards (never pressure-treated!)
- Stainless steel screws
- Food-safe wood sealant
- Drill with 1/4 inch bit
- Level and measuring tape
My secret weapon? Marine-grade silicone caulk for the corners. I learned this trick from a boat-building friend, and it’s made my boxes practically leak-proof!
Creating the Perfect Drainage System
This is where most windowsill gardens fail, but not ours! Here’s my foolproof system:
- Drill drainage holes every 4 inches
- Create a raised bottom using cedar strips
- Add a removable drip tray
The game-changing addition I discovered was adding a layer of activated charcoal beneath the soil. It prevents that funky smell my first herb box developed and helps with drainage.
Windowsill-Friendly Herbs
Not all herbs thrive in windowsill conditions. These are my tried-and-true winners:
- Compact Greek basil
- Spicy globe basil
- English thyme
- Creeping savory
- Dwarf sage
The secret to success? Group herbs with similar water needs together. I learned this after my water-loving parsley drowned my drought-tolerant rosemary!
Maximizing Natural Light
Here’s where we get clever with light optimization:
- Paint the interior sides white for light reflection
- Use aluminum foil strips behind the box
- Position herbs by height (shortest in front)
My favorite pro tip? I attach small mirror tiles to the back of the box at a 45-degree angle. This bounces light to the undersides of the leaves, leading to bushier growth. Such a game-changer!
Ready to take your herb gardening to the next level? Click that next button to discover how to create a hydroponic herb garden that’ll revolutionize your kitchen game! I’ll show you my super simple DIY hydroponic setup that costs less than $50 and produces herbs twice as fast as soil growing. Plus, I’ll share the hilarious story of how my first hydroponic attempt flooded my kitchen – and how you can avoid my rookie mistakes!


GIPHY App Key not set. Please check settings