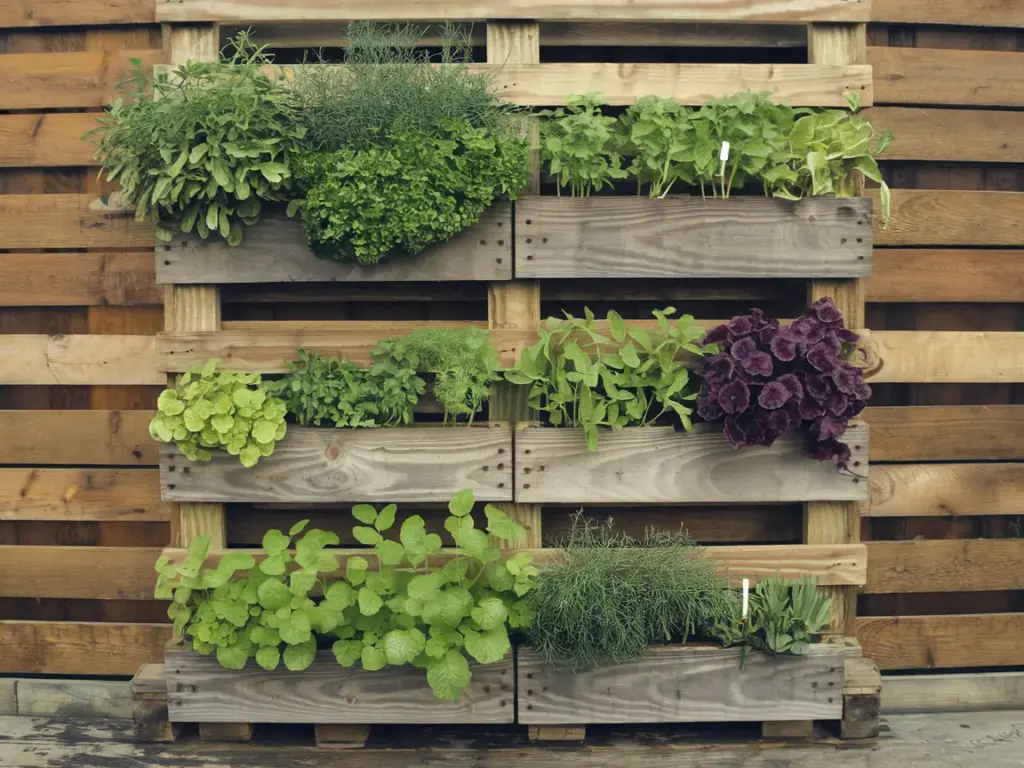
2. Vertical Pallet Herb Garden

When one of my students brought up the idea of using a pallet for herbs, I was skeptical. But after creating one for our school’s garden club, I became absolutely obsessed with this space-saving solution. There’s something magical about transforming what’s essentially garbage into a thriving vertical garden!
Choosing and Preparing Your Pallet
First things first – safety is non-negotiable. Not all pallets are created equal! Look for ones marked with “HT” (heat treated) rather than “MB” (methyl bromide). I once grabbed a random pallet from behind a store and later discovered it was chemically treated – straight into the dumpster it went!
Here’s your prep checklist:
- Sand rough edges thoroughly
- Apply food-safe sealant (2-3 coats)
- Check for loose nails or splinters
- Add a backing board for stability
The most crucial step that most people skip? Let your sealed pallet dry for at least 48 hours in a well-ventilated area.
Installation and Materials
You’ll need:
- Landscape fabric (the thick kind!)
- Heavy-duty staple gun
- Potting soil mix
- Wall anchors rated for 100+ pounds
- Level and mounting brackets
Here’s a pro tip I learned the hard way: Install the landscape fabric BEFORE mounting the pallet. My first attempt involved some pretty impressive acrobatics trying to do it after mounting!
Space-Efficient Design Strategies
The key to maximizing space is thinking in layers. I create pocket plantings by stapling landscape fabric to form deep pouches. My game-changing discovery was using a zigzag pattern rather than straight rows – this gives each herb more room to spread.
The bottom row gets the deepest pockets (6 inches), while the top rows are slightly shallower (4 inches). This helps manage water flow and prevents the dreaded soil washout that ruined my first attempt.
Best Herbs for Vertical Success
After much trial and error, these herbs have proven to be vertical growing champions:
- Trailing thyme (perfect for top rows)
- Compact oregano
- Bush basil (not the tall Italian variety)
- Creeping rosemary
- Dwarf sage
The secret to success? Place drought-tolerant herbs at the top and thirstier ones at the bottom. My first pallet garden failed because I had water-loving parsley at the top – it was like trying to keep a fish happy in a desert!
Watering System Setup
This is where things get interesting! I’ve developed a drip irrigation system using:
- 1/4 inch soaker hose
- Timer attachment
- Pressure regulator
- Micro-sprayers for each pocket
The absolute game-changer was adding a moisture-retention gel to the soil mix. This reduces watering needs by almost 50%!
Want to see what else you can do with limited space? Click that next button to discover my favorite windowsill herb box design. I’ll show you how to create a self-watering system that’s perfect for busy people (or forgetful waterers like I used to be!), plus a clever trick for maximizing sunlight exposure that will have your herbs growing like they’re in a greenhouse!


GIPHY App Key not set. Please check settings