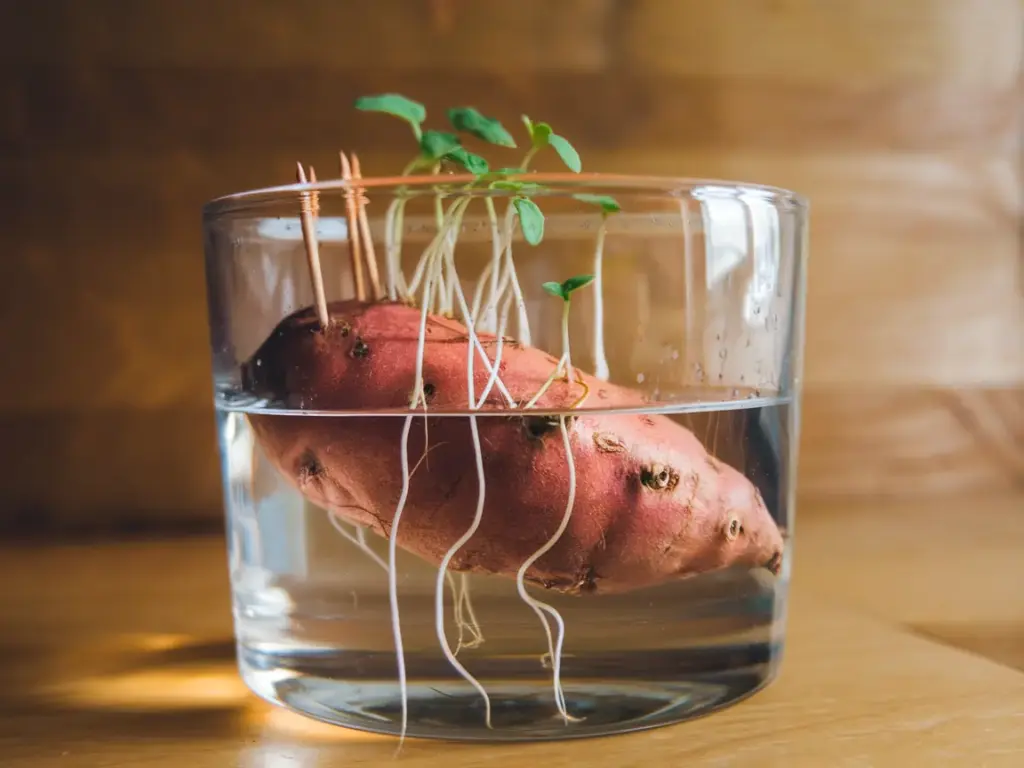
The Slip-Starting Success Formula

Let me tell you about my first attempt at growing sweet potato slips – it was a complete disaster! I had grabbed some organic sweet potatoes from the grocery store, stuck them in water, and waited… and waited… and nothing happened. After weeks of staring at those stubborn spuds, I finally figured out why: store-bought sweet potatoes are often treated with sprout inhibitors. Talk about a face-palm moment!
Selecting the Right Sweet Potato
Here’s what I’ve learned after years of trial and error: organic sweet potatoes from local farmers’ markets are your best bet. But even better? Save a few from your previous harvest. I keep a couple of my medium-sized beauties specifically for slip production each year. They should be firm, blemish-free, and about the size of a large apple.
The Perfect 3-Step Slip-Starting Method
- First, grab your sweet potato and give it a good wash. Don’t scrub too hard – you don’t want to damage those precious growth nodes!
- Now, here’s my secret weapon: suspend the sweet potato using toothpicks in a clear glass container, but only submerge the bottom third in water. I learned this the hard way after drowning several potatoes completely – trust me, that just leads to rot!
- Place your setup in a warm spot that gets indirect sunlight. The ideal temperature is between 75-80°F (I keep mine on top of my fridge where it’s consistently warm).
Water vs. Soil Method: The Great Debate
After testing both methods extensively, I’ve found that starting in water and then transferring to soil gives the best results. Here’s why: the water method lets you monitor root development easily, and you can spot any issues before they become problems.
When those first sprouts reach about 6 inches, I gently twist them off and pop them into small containers filled with a light potting mix. This two-step process has given me a nearly 100% success rate!
Time-Saving Propagation Hacks
Want to know my favorite trick? I use an old heating mat from my seed-starting days to speed up the sprouting process. It usually cuts the waiting time from 6 weeks down to about 4 weeks. Just make sure to check the water level daily – those heated sweet potatoes can get thirsty!
Warning Signs Your Slips Need Attention
Keep an eye out for these red flags:
- Black spots on the potato (remove it immediately to prevent spread)
- Yellowing leaves on your slips (usually means they need nutrients)
- Leggy, thin sprouts (move them closer to the light source)
I once ignored some black spots thinking they weren’t a big deal… and ended up losing an entire batch of slips. Don’t make my rookie mistake – act fast if you see any issues!
Ready to take your sweet potato growing journey to the next level? Click the “next” button below to discover my proven planting strategies that will help you achieve those impressive 3-5 pound yields per container. I’ll show you exactly how deep to plant those slips and share my personal watering schedule that prevents 90% of common growing problems!


GIPHY App Key not set. Please check settings