6. Monitor and Prevent Common Plant Problems
Nothing breaks a plant parent’s heart like discovering your favorite plant covered in tiny bugs or mysteriously dropping leaves. I’ve been through it all – spider mites, root rot, mysterious leaf drop.
The good news? Most plant problems are totally preventable if you know what to look for.
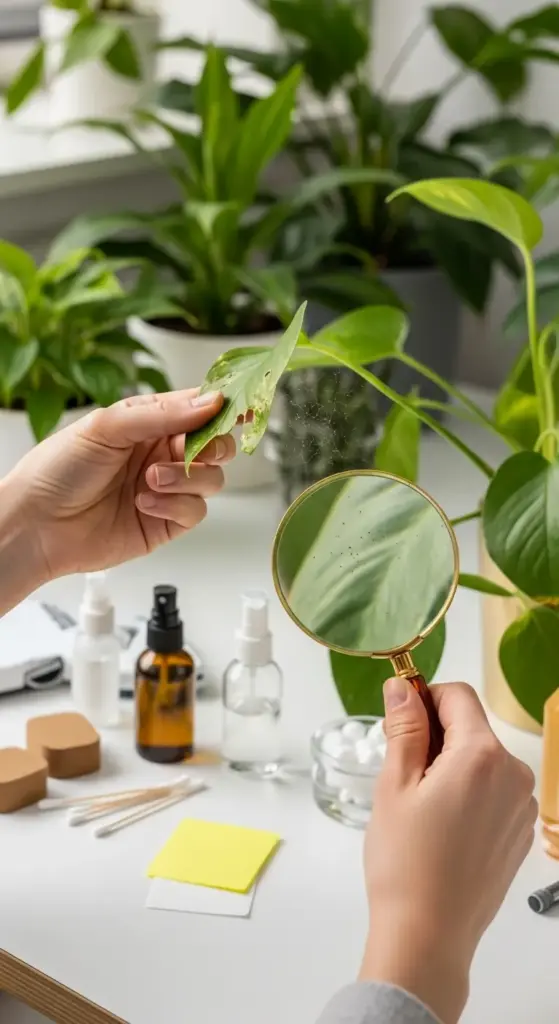
Early Pest Detection and Natural Treatment Methods
Spider mites are sneaky little devils. You’ll see tiny webs and stippled leaves before you actually spot the bugs themselves.
I check the undersides of leaves weekly with a magnifying glass. Sounds obsessive, but catching pests early saves so much heartache.
Aphids cluster on new growth and leave sticky honeydew everywhere. My fiddle leaf fig got infested and I didn’t notice until ants started showing up!
Neem oil spray is my go-to natural treatment. Mix it with water and a drop of dish soap, spray weekly until pests are gone.
Fungus gnats are those annoying little flies that hover around soil. They love overwatered plants and can multiply crazy fast.
Yellow sticky traps catch the adults, while letting soil dry out kills the larvae. I learned this after dealing with clouds of gnats for weeks.
Scale insects look like little brown bumps on stems and leaves. I thought they were part of the plant until I tried to scrape one off!
Rubbing alcohol on a cotton swab removes scale insects individually. Tedious but effective for small infestations.
Disease Prevention Strategies
Good air circulation prevents most fungal problems. I learned this after losing three plants to powdery mildew in my stuffy bathroom.
Watering at soil level instead of on leaves reduces disease risk dramatically. Wet leaves are like welcome mats for fungal infections.
Proper spacing between plants helps air flow and prevents disease spread. I used to cram plants together thinking they’d be happier – wrong!
Clean tools between plants prevent spreading diseases. I keep rubbing alcohol and paper towels handy for quick sterilization.
Quarantine new plants for at least two weeks before introducing them to your collection. This rule has saved me from multiple pest disasters.
Remove dead or dying plant material immediately. Those brown leaves aren’t just ugly – they’re disease breeding grounds.
Troubleshooting Yellowing Leaves, Brown Tips, and Dropping
Yellow leaves can mean so many things! Overwatering, underwatering, natural aging, nutrient deficiency – it’s like plant detective work.
Bottom leaves yellowing is usually natural aging, especially on older plants. Don’t panic if it’s just one or two leaves.
New leaves yellowing often indicates overwatering or poor drainage. I killed my first peace lily this way.
Brown leaf tips usually mean low humidity or water quality issues. My spider plants got crispy tips until I started using filtered water.
Sudden leaf drop can be from shock – moving plants, temperature changes, or watering schedule changes.
Gradual leaf drop might indicate root problems, pests, or seasonal changes. My ficus benjamina drops leaves every winter like clockwork.
I keep a plant journal now to track patterns. Helps me figure out if problems are environmental or something more serious.
When to Repot and How to Do It Safely
Roots growing out of drainage holes is the clearest sign it’s time to repot. Don’t wait until they’re completely rootbound!


Spring is the best time for repotting when plants are entering their growing season. They recover faster from the shock.
Go up only one pot size at a time. I learned this lesson after drowning a monstera in a pot that was way too big.
Gently tease apart circled roots before putting the plant in fresh soil. Helps them spread out in their new home.
Fresh potting mix is essential – don’t reuse old, compacted soil. Plants need that fresh, airy soil structure.
Water thoroughly after repotting but then let the plant settle for a week before resuming normal care.
I used to repot in fall thinking plants needed fresh soil before winter. Big mistake – they need time to establish roots before dormancy.
Quarantine Procedures for New Plants
Two weeks minimum in isolation before new plants join the family. I learned this after spider mites spread from one new plant to six others.
Separate room or area works best for quarantine. My spare bathroom became plant quarantine central.
Inspect thoroughly before and during quarantine. Check every leaf, stem, and the soil surface for signs of pests.
Different watering tools for quarantine plants prevent spreading problems through contaminated equipment.
Shower treatment for new plants helps remove any hitchhiking pests. Gentle spray, not full blast!
I take photos of new plants during quarantine to document any changes or problems that develop.
Building a Plant First-Aid Kit
Neem oil for pest control – get the concentrated kind and mix as needed. Lasts longer and costs less than pre-mixed sprays.
Rubbing alcohol for spot-treating scale and mealybugs. Keep cotton swabs handy for precise application.
Hydrogen peroxide for root rot treatment. Mix with water to treat affected roots during repotting.
Sharp, clean scissors for removing dead or diseased plant material. I keep dedicated plant scissors separate from household ones.
Yellow sticky traps for flying pests like fungus gnats and whiteflies. Stock up – you’ll use them more than you think.
Magnifying glass for pest detection. Makes spotting tiny spider mites and thrips so much easier.
Systemic insecticide for severe infestations when natural methods aren’t enough. Use as last resort and follow directions exactly.
Fungicide spray for treating fungal infections. Copper-based ones work well for most houseplant diseases.
Extra pots and fresh soil for emergency repotting when you discover root rot or severe pest problems.
I keep everything in a plastic storage box so it’s all in one place when plant emergencies strike.
Ready to create the perfect environment where your healthy, problem-free plants can absolutely thrive? The final section covers creating ideal growing conditions – the environmental tweaks that transformed my plants from surviving to flourishing beyond my wildest dreams. Click “next” to discover the game-changing environment secrets!


GIPHY App Key not set. Please check settings