Hack #4: Master Garden Care Without Spending Hours Outside
Real talk — there was a summer where I was spending three hours every weekend in my garden just trying to keep things alive.
Watering. Weeding. Fertilizing. Repeat. It felt like a part-time job I didn’t apply for.
Something had to change. Because a garden that stresses you out is defeating the entire purpose. I started researching smarter systems, not harder work — and what I found genuinely transformed my relationship with my outdoor space.
Simple Watering Schedules That Actually Make Sense
Here’s the number one watering mistake most beginners make — and I made it for years.
Watering a little bit every single day.
It feels right. It feels responsible. But it’s actually training your plants to develop shallow root systems because the water never penetrates deep enough to encourage roots to grow downward. Shallow roots = weak, stressed plants.
The correct approach is deep, infrequent watering. Most established garden plants need about 1 inch of water per week — either from rainfall or irrigation. Instead of daily light sprinkles, water deeply 2–3 times per week, letting the water soak down 6–8 inches into the soil.
How do you know if you’ve watered enough? Stick your finger 2 inches into the soil after watering. If it’s moist at that depth, you’re good. If it’s dry, water longer next time.
The best time to water? Early morning — between 6am and 10am. This gives foliage time to dry before evening, which dramatically reduces fungal disease problems. Watering at night leaves moisture sitting on leaves for hours. I learned this the hard way after losing an entire rose bush to black spot fungus.
Timing by season matters too:
- Spring: Water 2x per week as plants establish
- Summer: Water 3x per week during heat waves, checking soil moisture daily
- Fall: Scale back to 1–2x per week as temperatures drop
- Winter: Most established plants need little to no supplemental watering
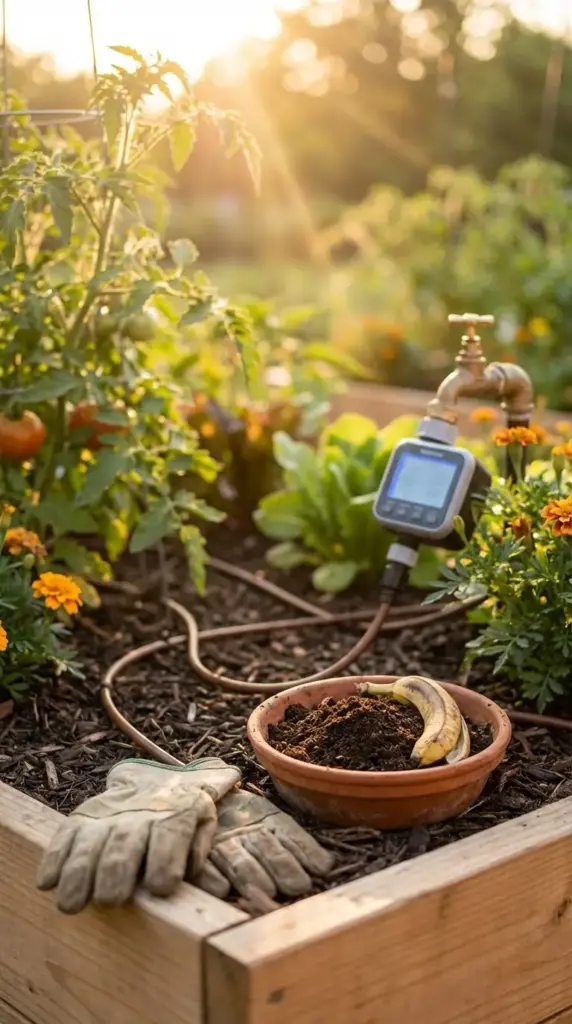
Drip Irrigation: The Lazy Gardener’s Best Friend
I say “lazy” with complete affection — because working smarter is always better than working harder.
A drip irrigation system delivers water slowly and directly to the root zone of your plants, eliminating evaporation and runoff. Studies show drip irrigation uses 30–50% less water than traditional sprinkler systems. That’s better for the environment AND your water bill.
And here’s the part that changed my life — you can set it on a timer.
A basic drip irrigation kit from Amazon or Home Depot runs about $25–$60 for a starter set that covers a standard garden bed. You connect it to your outdoor spigot, lay the drip lines along your plants, and attach a digital timer (about $15–$25 extra) that turns the water on and off automatically.
I set mine to run every Tuesday and Friday at 7am. My garden gets watered whether I’m home or not. Whether I’m busy or exhausted or just don’t feel like it. It just… happens.
For container gardens specifically, look into self-watering planters — they have a built-in reservoir at the bottom that wicks water up to the roots as needed. They cost a bit more upfront (usually $20–$40 per planter) but they are genuinely worth every penny for busy women who travel or have unpredictable schedules.
Organic Fertilizing Tips That Keep Your Garden Thriving
Let me be upfront — I was a synthetic fertilizer person for a long time.
Those bright blue granules, the quick green-up, the instant results. It felt like magic. But over time I noticed my soil was getting harder, less alive, and my plants were becoming almost dependent on the fertilizer to look good.
Switching to organic fertilizing methods was one of the best things I did for my long-term garden health.
Here’s what actually works:
Compost is king. I know I’ve mentioned it before but it deserves repeating. Working 2–3 inches of compost into your soil each spring is the single most impactful thing you can do for plant health. It improves soil structure, adds beneficial microorganisms, and releases nutrients slowly over the entire growing season. A $7 bag of compost does more for your garden than a $25 bottle of liquid fertilizer.
Worm castings are basically compost on steroids. They’re incredibly nutrient-dense, completely gentle on plants (you literally cannot over-apply them), and they improve soil drainage and moisture retention simultaneously. Mix them into potting soil or sprinkle around the base of plants. A 5-pound bag costs about $10–$15 and goes a long way.
Fish emulsion sounds disgusting — and honestly, it kind of is. It smells terrible. But plants absolutely love it. It’s a fast-acting liquid organic fertilizer that’s particularly great for leafy greens and vegetables. Dilute it according to package directions and apply every 2–3 weeks during the growing season.
Banana peel fertilizer is my favorite free hack. Banana peels are rich in potassium and phosphorus — nutrients that promote flowering and root development. Chop them up and bury them near the base of flowering plants, or soak peels in water for 48 hours and use the water as a liquid fertilizer. Completely free. Genuinely effective.
A simple seasonal fertilizing schedule to follow:
- Early spring: Apply compost and a balanced slow-release organic fertilizer as plants wake up
- Late spring/early summer: Side-dress vegetable beds with worm castings or fish emulsion
- Midsummer: Light application of liquid fertilizer for heavy feeders like tomatoes and roses
- Fall: Apply compost only — no nitrogen fertilizers, as they encourage new growth that gets damaged by frost
- Winter: Nothing. Let your garden rest.
Your Seasonal Garden Care Checklist
This is the framework that keeps my garden looking good all year without overwhelming me.
Print this out. Seriously.
🌸 Spring (March–May)


- Remove winter mulch and dead plant material
- Divide and transplant overcrowded perennials
- Amend soil with compost before planting
- Plant cool-season crops: lettuce, spinach, peas, pansies
- Install drip irrigation before the busy season hits
- Apply a fresh layer of mulch (2–3 inches) after soil warms
☀️ Summer (June–August)
- Water deeply 2–3 times per week
- Deadhead spent flowers weekly to encourage continuous blooming
- Monitor for pests every few days — catch problems early
- Harvest vegetables regularly to keep plants producing
- Apply liquid fertilizer to heavy feeders every 2–3 weeks
- Add mulch if it’s thinned out — summer heat evaporates moisture fast
🍂 Fall (September–November)
- Plant spring bulbs (tulips, daffodils, alliums) before first frost
- Cut back perennials after the first hard frost — not before
- Plant cool-season crops again: kale, chard, broccoli
- Apply a thick layer of compost to all beds
- Bring tender container plants indoors before temperatures drop below 40°F
- Clean and oil your garden tools before storing for winter
❄️ Winter (December–February)
- Leave some seed heads standing — they feed birds and add visual interest
- Apply a thick mulch layer over perennial beds for insulation
- Order seed catalogs and plan next year’s garden (this is genuinely one of my favorite winter activities)
- Clean, sharpen, and store all tools properly
- Test your soil pH if you haven’t recently — winter is a great time to amend
Dealing With Weeds, Pests, and Poor Soil
These are the three things that make gardeners want to give up. I’ve been there.
But each one has a straightforward solution once you understand what’s actually happening.
Weeds:
The most important thing to understand about weeds is this — they’re easier to pull when they’re small. A two-minute weed session twice a week beats a two-hour session once a month every single time.
The second most important thing? Mulch prevents most weeds from germinating in the first place. A proper 2–3 inch mulch layer blocks sunlight from reaching weed seeds in the soil. This one habit alone reduced my weeding time by about 70%.
For weeds that do pop up, pull them before they flower and set seed. One dandelion going to seed can release up to 2,000 seeds into your garden. Pull it early and you’re preventing hundreds of future weeds.
Pests:
The first line of defense is simply paying attention. Walk through your garden every few days and look at the undersides of leaves — that’s where most pest eggs and early infestations hide.
For aphids (the most common garden pest), a strong spray of water from your hose knocks them off plants effectively. Do this in the morning so plants dry quickly.
Neem oil is my go-to organic pest control spray. It’s derived from the neem tree, it’s safe for humans, pets, and beneficial insects when used correctly, and it handles a wide range of common garden pests including aphids, spider mites, and whiteflies. Mix 2 tablespoons neem oil + 1 teaspoon dish soap + 1 gallon water and spray on affected plants in the evening. A bottle costs about $10–$15 and lasts an entire season.
Poor Soil:
This is the root of most garden problems — literally.
Poor soil is usually either too compacted, too sandy, too clay-heavy, or lacking in organic matter. The fix for all of these is the same: add compost. Lots of it. Consistently. Every single season.
If you want to get specific, a soil test will tell you exactly what your soil is missing. Your local cooperative extension office (every U.S. state has one) offers soil testing for about $15–$20 and gives you a detailed report with specific amendment recommendations. This is genuinely one of the most underused resources in home gardening.
For acidic soil (common in the Southeast and Pacific Northwest), add garden lime to raise the pH. For alkaline soil (common in the Southwest and Midwest), add sulfur or peat moss to lower it. Most vegetables and flowers prefer a pH between 6.0 and 7.0.
Time-Saving Tools That Are Actually Worth Buying
I’m going to keep this list short because you don’t need much.
A long-handled hoe for weeding while standing upright. Your back will thank you. The Collinear hoe design is particularly efficient — it slices weeds off at the soil surface with a push-pull motion. About $30–$40.
A soil moisture meter — a simple probe you stick in the soil that tells you exactly how wet or dry it is. Takes the guesswork out of watering completely. Costs about $10–$15 on Amazon and lasts for years.
A garden kneeler and seat combo — it flips between a kneeling pad and a low seat, with handles to help you get up and down. If you’re going to spend money on one comfort item, make it this one. About $25–$40 and genuinely life-changing for long gardening sessions.
A battery-powered sprayer for applying neem oil, liquid fertilizer, or any other spray treatments. No more pumping by hand. A basic model runs about $30–$50 and makes spray applications take a fraction of the time.
The theme here is reducing physical effort and mental load. The easier you make garden maintenance, the more consistently you’ll do it — and consistency is what creates a truly beautiful, thriving garden.
You are so close to having everything you need for your dream backyard. 🌿
Hit “Next” below and let’s talk about the fun part — styling your backyard like it’s an outdoor living room. Lighting, pathways, furniture, and the design tricks that make your garden look like it belongs in a magazine. This is the section where everything comes together, and trust me, you don’t want to skip it. ✨🙌


GIPHY App Key not set. Please check settings