Hack #3: DIY Garden Beds and Borders on a Budget
I once spent an entire Saturday at a fancy garden center, loading up my cart with beautiful pre-made planters and decorative edging. The total at checkout? $347.
I put everything back and drove home.
There had to be a better way — and spoiler alert, there absolutely was. Once I figured out how to build and style garden beds on a real budget, I never looked back. And my garden actually looks better now than it did with all that expensive stuff.
How to Build a Raised Garden Bed for Under $50
Okay, let’s get into it — because this is one of those things that sounds complicated but really, really isn’t.
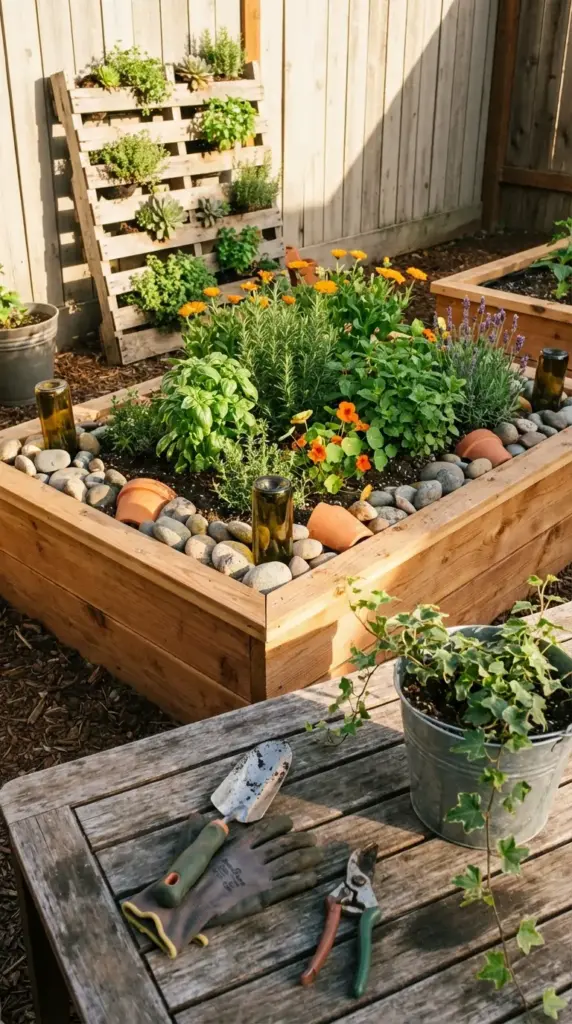
A basic 4×8 raised garden bed is the gold standard for beginners. It’s big enough to grow a meaningful amount of plants, but small enough that you can reach the center from either side without stepping in. That matters more than you’d think.
Here’s exactly what you need:
Materials list for a basic 4×8 raised bed:
- Two 8-foot boards (2×10 or 2×12 inches wide)
- Two 4-foot boards (same width)
- Four corner brackets OR four short 4×4 corner posts
- Wood screws (exterior grade, 2.5 inch)
- Landscape fabric for the bottom (optional but helpful)
The best wood to use? Cedar is the gold standard — it’s naturally rot-resistant and can last 10–20 years in the ground. But I get it, cedar is pricier. Untreated pine works fine and costs significantly less. Just know it’ll start breaking down after about 3–5 years.
Avoid pressure-treated lumber for vegetable beds. The chemicals used in the treatment process can leach into your soil and ultimately into your food. Not worth it.
Here’s the build process, step by step:
Step 1: Cut or have your lumber cut at the store. Most hardware stores like Home Depot or Lowe’s will cut boards for free or a small fee. Ask them to cut your 8-foot boards in half for the short sides.
Step 2: Lay out your boards in a rectangle on a flat surface. Attach corner brackets or screw the boards directly into your corner posts. Pre-drill your holes first — this prevents the wood from splitting.
Step 3: Place your frame in your chosen location. Level ground matters here. Spend five minutes making sure it’s even or your bed will look crooked and water will pool unevenly.
Step 4: Line the bottom with landscape fabric or cardboard to suppress weeds coming up from below. Cardboard is free and works just as well — this is the hack.
Step 5: Fill with a quality soil mix. The best ratio for raised beds is roughly 60% topsoil, 30% compost, and 10% perlite or coarse sand for drainage. A pre-mixed “Mel’s Mix” style blend is also widely available at garden centers.
Total cost? Typically $35–$60 depending on your lumber choice and soil. That’s it.
Creative Border Ideas Using Repurposed Items
Garden borders are one of those things that can make or break the overall look of your landscape design.
A clean, defined border makes even a simple garden bed look intentional and polished. No border? Even a beautiful planting can look like an accident.
But here’s the thing — you do not need to spend money on borders. Some of the most charming garden edging I’ve ever seen was made from stuff people already had lying around.
Wine bottles. Bury them neck-down in a line along your garden edge. The bottoms face up and catch the light beautifully. It sounds weird until you see it — then it looks like actual art. Green, brown, and clear bottles mixed together create a gorgeous mosaic effect.
Terracotta pot shards. Got a broken pot? Don’t throw it away. Push the curved pieces into the soil along your border, overlapping slightly like scales. It creates a beautiful, organic-looking edge that costs absolutely nothing.
River rocks or pebbles. If you live near a creek or beach, free rocks are literally everywhere. A single layer of smooth river rocks along a garden border looks clean, modern, and completely intentional. I’ve seen this look in $5,000 landscape designs.
Reclaimed bricks. Check Facebook Marketplace or your local Buy Nothing group — people give away old bricks constantly. A single row of bricks laid at a slight angle creates a classic cottage garden border that never goes out of style.
Fallen branches. Thick branches laid end-to-end create a rustic, woodland-style border that works beautifully in naturalistic garden designs. It decomposes slowly and actually adds organic matter to your soil over time. Functional AND free.
Landscape Fabric, Mulch, and Edging — The Polish Trio
Here’s the combination that separates a garden that looks maintained from one that looks neglected.


Landscape fabric goes down first, underneath your mulch. It suppresses weeds without blocking water and air from reaching your soil. Don’t skip this step. A roll of basic landscape fabric costs about $15–$25 and covers a surprisingly large area.
One important note — don’t use landscape fabric directly in planting beds where you’re growing perennials or vegetables. It makes it hard to plant and can actually cause problems over time. Use it in pathways and under decorative mulch areas instead.
Mulch is genuinely one of the best investments you can make in your garden. A 2–3 inch layer of mulch around your plants does three things simultaneously: it retains soil moisture (reducing watering needs by up to 25%), it regulates soil temperature, and it suppresses weeds.
Hardwood mulch is the most common and works great for most garden beds. Pine straw is a fantastic budget option in the Southeast — it’s cheap, it looks natural, and it’s slightly acidic which many plants love. A bag of mulch runs about $3–$5 at most hardware stores, and you can often get bulk mulch delivered for free from local tree trimming companies. Seriously — Google “free wood chip mulch delivery” in your city. This is one of my favorite budget hacks.
Metal or plastic edging installed along the border between your lawn and garden beds creates that crisp, clean line that makes everything look professionally done. Black steel edging is my personal favorite — it’s flexible, durable, lasts for decades, and costs about $1–$2 per linear foot. Install it once and you’re done.
Budget-Friendly Gardening Supplies Every Beginner Actually Needs
Let me save you from buying a bunch of stuff you don’t need.
I have a garage full of gardening gadgets I’ve used exactly once. Learn from my mistakes.
Here’s the honest beginner supply list — nothing extra, nothing fancy:
A good trowel — your most-used tool. Spend a little more here. A Fiskars or Radius Garden trowel runs about $15–$20 and will last years. Cheap trowels bend and break immediately.
Garden gloves — get a pair with rubber-coated palms. They protect your hands, give you grip, and cost about $8–$12. I go through about two pairs a season.
A watering can or basic hose with an adjustable nozzle — for seedlings and delicate plants, a gentle shower setting is essential. A decent adjustable nozzle costs about $10.
A hand pruner — for deadheading flowers, trimming stems, and general cleanup. Fiskars bypass pruners are about $20 and are genuinely excellent.
Compost — not exactly a tool, but the single most important thing you can add to your garden. A bag of compost costs $5–$8. Or start a compost bin at home for free using kitchen scraps. Your soil will thank you in ways that no fertilizer can replicate.
Where to shop smart: Dollar Tree and dollar stores often carry basic garden tools that work perfectly fine for light use. Facebook Marketplace is incredible for finding used tools in great condition. And end-of-season sales at Home Depot and Lowe’s — usually starting in late August — can get you supplies at 50–70% off for the following year.
Upcycled Planter Ideas That Are Basically Backyard Art
This is my absolute favorite part of budget gardening — turning trash into treasure.
Upcycled planters are having a serious moment right now, and for good reason. They’re sustainable, they’re unique, and they add personality to your outdoor space that you simply cannot buy at a garden center.
Old colanders make incredible hanging planters. The drainage holes are already built in! Line with coco coir, fill with soil, plant trailing plants like sweet potato vine or lobelia, and hang from a shepherd’s hook. Stunning and costs nothing if you find one at a thrift store for $2.
Wooden pallets can be transformed into vertical garden walls. Stand one upright, staple landscape fabric to the back and sides to create pockets, fill with soil, and plant succulents or herbs in the slats. A single pallet garden can hold 20–30 small plants in a space that’s only 3 feet wide.
Old rain boots and galoshes — especially colorful kids’ ones — make the most charming little planters for a cottage garden or children’s garden area. Drill a drainage hole in the sole, fill with soil, and plant with pansies or petunias. People stop and smile every single time.
Vintage suitcases found at thrift stores or estate sales make gorgeous elevated planters for a patio or porch. Line with plastic sheeting, add drainage holes, fill with soil, and plant with a mix of trailing and upright plants for a full, lush look.
Galvanized metal tubs and buckets — the kind you find at farm supply stores or flea markets — are incredibly versatile. They’re durable, they look great in both rustic and modern garden styles, and a large galvanized tub can hold enough soil to grow tomatoes, peppers, or even dwarf fruit trees.
The rule I follow with upcycled planters: drainage first, always. No matter what container you’re using, make sure water can escape from the bottom. Without drainage, roots rot and plants die. Drill holes if you need to — it takes 30 seconds and saves your plants.
Your garden is really coming together now. 🌿
Tap “Next” below to unlock Hack #4 — and this one is a game changer for anyone who doesn’t have hours to spend outside every week. We’re talking about mastering garden care without it taking over your life. Watering hacks, organic fertilizing tips, and the seasonal checklist that keeps everything looking lush with minimal effort. If you’ve ever felt like your garden is more work than joy, this section was written for you. 🙌


GIPHY App Key not set. Please check settings