Step-by-Step Guide to Starting Your Companion Planting Garden
I remember the first time I tried to start a garden “properly.”
I had read approximately one million blog posts, had seventeen tabs open on my laptop, and was completely overwhelmed. There was so much conflicting advice that I almost didn’t start at all.
Sound familiar?
Here’s what I wish someone had told me back then — just follow the steps in order. Don’t skip ahead. Don’t overthink it. One step at a time, and you’ll have a thriving companion planting garden before you know it.
Step 1: Assess Your Space Honestly
Before you buy a single seed or tool, you need to take a good, honest look at what you’re working with.
And I mean really look. Not just a quick glance out the back door.
Start with sunlight. This is the most important factor in your entire garden — more important than soil, more important than watering, more important than which plants you choose.
Most vegetables need 6 to 8 hours of direct sunlight per day to produce well. Spend one full day observing your space and noting which areas get sun and for how long. This single step will save you so much frustration.
I once planted an entire raised bed of tomatoes in a spot that got maybe 4 hours of sun. I wondered all season why they were so leggy and barely producing. The answer was right there the whole time.
Then measure your space. Grab a tape measure and write down the actual dimensions of your garden area.
- A balcony or patio in NYC or Chicago might give you 10 to 20 square feet of container space — that’s enough for a meaningful companion garden.
- A standard backyard raised bed is typically 4×8 feet, giving you 32 square feet to work with.
- A community garden plot is usually around 10×10 or 10×20 feet.
Knowing your exact dimensions makes every step after this so much easier.
Also assess:
- Water access — how close is your nearest hose or spigot?
- Soil quality — if you’re planting in-ground, is the soil compacted, sandy, or clay-heavy?
- Wind exposure — rooftop and balcony gardens in cities like New York or Chicago can get brutal wind that damages tall plants
- Existing plants — what’s already growing that you can incorporate companion plants around?
Step 2: Choose Your Companion Planting Combinations
Now the fun part begins. Sort of.
This step trips people up because there are so many options. My advice — start with what you actually want to eat or grow, then build your companion combinations around that.
Pick two or three anchor plants — the main crops you’re most excited about. Everything else gets chosen to support them.
For example:
- Love tomatoes? Your companions are basil, marigolds, carrots, and parsley.
- Want a salad garden? Build around lettuce with chives, nasturtiums, and tall flowers for shade.
- Growing squash? Pair with nasturtiums, marigolds, and beans for the classic Three Sisters approach.
Don’t try to grow everything your first season. I know it’s tempting. Resist it.
A focused, well-planned small garden will always outperform a chaotic, overcrowded large one.
Consider your climate zone too. The USDA Plant Hardiness Zone Map divides the US into zones based on average minimum winter temperatures.
- New York City — Zone 7a
- Los Angeles — Zone 10a/10b
- Chicago — Zone 5b/6a
- Seattle — Zone 8b
- Dallas — Zone 8a
- Atlanta — Zone 7b/8a
Your zone determines your planting dates, frost windows, and which crops thrive in your area. You can look up your exact zone at planthardiness.ars.usda.gov.
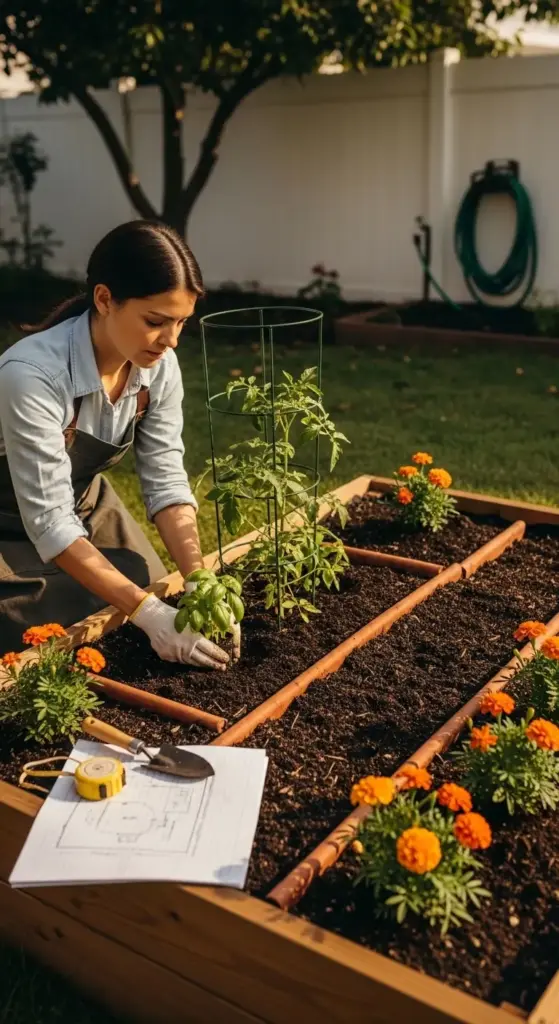
Step 3: Map Out Your Garden Layout
Do not skip this step. I am begging you.
Every single time I’ve skipped the planning phase and just started planting, I’ve regretted it. Plants end up in the wrong spots, companions get separated, and the whole bed feels chaotic.
Option 1: Graph paper sketch
Draw your bed to scale on graph paper — let each square represent one square foot. Write in each plant by name and check your companion planting chart to make sure neighbors are compatible.
This takes maybe 20 minutes and saves hours of frustration later.
Option 2: Use the Planter App
As I mentioned in the design section, the Planter App is genuinely excellent for this.
It has a drag-and-drop interface, built-in companion planting compatibility indicators, and it even tracks your planting dates and sends reminders. The free version covers most of what beginners need.
Key layout principles to follow:
- Tall plants go on the north side of the bed so they don’t shade shorter plants
- Heavy feeders (tomatoes, corn, squash) should be spaced away from each other to avoid competing for nutrients
- Pest-repelling companions like marigolds and nasturtiums should be distributed throughout the bed, not just planted around the border
- Leave adequate spacing — overcrowding is one of the top causes of disease in home gardens
Step 4: Prepare Your Soil
Here’s the honest truth — most garden soil is not ready to plant in straight away.
Whether you’re filling a new raised bed or amending existing in-ground soil, this step is what separates a garden that survives from one that genuinely thrives.
For a new raised bed, I use this mix that has never let me down:
- 60% topsoil — provides structure and weight
- 30% compost — feeds your plants and supports soil biology
- 10% perlite or coarse sand — improves drainage and prevents compaction
This is sometimes called “Mel’s Mix” — a variation of the formula popularized by Mel Bartholomew in Square Foot Gardening. It works beautifully for companion planting beds because it’s loose, nutrient-rich, and drains well.
For existing in-ground soil, start by loosening it to about 12 inches deep with a garden fork. Don’t use a rototiller if you can avoid it — tilling destroys the mycorrhizal fungal networks in your soil that help plants communicate and share nutrients.


Yes, plants actually communicate through fungal networks underground. It’s called the “wood wide web” and it’s one of the most fascinating things about gardening.
Then add:
- 2 to 3 inches of compost worked into the top layer
- A handful of worm castings per planting hole
- Azomite trace minerals if your soil is particularly depleted
Do a basic soil pH test before planting — most vegetables prefer a pH between 6.0 and 7.0. Inexpensive test kits are available at any garden center for around $10, or you can send a sample to your local cooperative extension office for a more detailed analysis.
Step 5: Plant in the Right Sequence
This is something most beginner guides completely skip over — and it really matters.
Not everything goes in the ground at the same time. Planting in the right order ensures that your companion relationships actually have time to establish properly.
Start with seeds that need the longest growing season first:
- Tomatoes, peppers, and eggplant should be started indoors 6 to 8 weeks before your last frost date
- Onions and leeks can be started indoors 10 to 12 weeks before last frost
Then transplant or direct sow in this general order:
- Cool-season crops first (lettuce, spinach, carrots, onions) — these go in 2 to 4 weeks before your last frost date
- Transplant your tomatoes, peppers, and other warm-season crops after your last frost date has passed
- Direct sow beans, squash, and cucumbers once soil temperature reaches at least 60°F — these crops hate cold soil and will just sit there sulking if you plant too early
- Add companion flowers last — marigolds, nasturtiums, and basil go in after your main crops are established
Planting companions after your main crops gives the vegetables a head start and ensures the companions don’t outcompete them for space and light early on.
Spacing matters more than most people think:
| Plant | Spacing |
|---|---|
| Tomatoes | 24–36 inches apart |
| Peppers | 18–24 inches apart |
| Basil | 12–18 inches from tomatoes |
| Marigolds | 8–12 inches apart |
| Lettuce | 6–8 inches apart |
| Beans | 4–6 inches apart |
| Squash | 24–36 inches apart |
| Carrots | 2–3 inches apart |
Step 6: Water, Mulch, and Set Up Your Care Routine
A garden without a care routine is just a really expensive experiment.
The good news — once you set this up, it becomes second nature. Like brushing your teeth. You just do it.
Watering
Most vegetable gardens need about 1 inch of water per week — from rain or irrigation combined.
The best time to water is early morning — before 10am if possible. This gives foliage time to dry before evening, which dramatically reduces the risk of fungal disease.
Water at the base of plants, not overhead. Wet leaves invite disease. A soaker hose or drip irrigation system is the gold standard for companion gardens — it delivers water directly to the root zone and keeps foliage dry.
A basic drip irrigation kit for a 4×8 raised bed runs about $25–$40 on Amazon and is genuinely one of the best investments you can make.
Mulching
Right after planting, apply 2 to 3 inches of straw or wood chip mulch around your plants.
Keep mulch 2 to 3 inches away from plant stems to prevent rot and discourage pests from nesting right at the base.
Mulch does three things simultaneously — retains moisture, regulates soil temperature, and suppresses weeds. It’s one of those things that makes your whole garden easier to maintain with almost zero ongoing effort.
Your Weekly Care Routine
Keep it simple. Here’s what mine looks like:
- Monday — Quick visual check of all plants, look for pest damage or disease
- Wednesday — Deep watering if no rain, check soil moisture with finger test (if the top inch is dry, water)
- Friday — Harvest anything ready, deadhead companion flowers like marigolds to keep them blooming
- Every 2 weeks — Light feeding with diluted liquid kelp or fish emulsion fertilizer for an organic nutrient boost
That’s it. Maybe 20 to 30 minutes total per week for a standard raised bed. Very manageable.
Step 7: Monitor Plant Relationships and Adjust as Needed
Here’s the part of companion planting that nobody really talks about — it’s not set and forget.
Your garden is a living system, and living systems need observation and occasional adjustment.
Watch for these signs that a companion relationship isn’t working:
- Yellowing leaves on one plant near a specific neighbor — could indicate nutrient competition or allelopathic interference
- One plant dramatically outgrowing another and shading it out — may need to be moved or pruned back
- Pest pressure concentrated in one area despite companion plants nearby — try adding more pest-repelling companions or relocating them closer
Keep a simple garden journal. I know it sounds old-fashioned, but it is genuinely one of the most useful things you can do as a gardener.
Write down:
- What you planted and where
- Planting dates
- What’s working and what isn’t
- Pest or disease issues and how you addressed them
- Harvest notes
After two or three seasons, you’ll have a personalized companion planting guide built entirely from your own garden’s data. That’s more valuable than any blog post — including this one.
Don’t be afraid to move things. If a combination isn’t working, gently transplant one of the plants to a better location. Most vegetables handle transplanting reasonably well if you do it in the early morning, water thoroughly beforehand, and replant quickly.
Gardening is an ongoing conversation with your plants. The more you listen, the better you get at it.
👇 Hit “Next” below to learn how to adapt your companion planting garden through every season — because the best gardens don’t stop producing in September. We’re talking fall harvests, winter prep, and how to keep your garden working hard all year long. 🍂🌿


GIPHY App Key not set. Please check settings